Posts filed under ‘Windows’
Windows server 2022 – Cannot extend C: partition
Those who are installing new Windows 2022 server , may realize that the C: drive cannot be extended . This is due to the recovery partition is created next to the C: drive.

Most of the google search references pointing out to use a 3rd party tool to modify the disk or delete the recovery partition via diskpart utility using the override switch and then extend the C: drive. However , This deletion will lead you to a situation you lose the recovery partition and unable to recover the server via the recovery media or similar methods. Thus I would recommend the below approach to safely transfer the recover partition to C: drive after deleting the original recovery partition.
Step1: Mount the Windows 2022 Image to the C:\Temp folder
DISM /Mount-image /imagefile:D:\sources\install.wim /Index:1 /MountDir:C:\temp/readonly /optimize
Step2: Transfer the recovery media to C: drive
robocopy /MIR C:\temp\Windows\System32\Recovery\ C:\Windows\System32\Recovery
Step3 : Set the recovery partition to C:\Windows\System32\Recovery
reagentc /setreimage /path C:\Windows\System32\Recovery
Step4: Unmount the Windows 2022 Image and verify the recovery partion status
Dism /Unmount-image /MountDir:C:\temp /discard
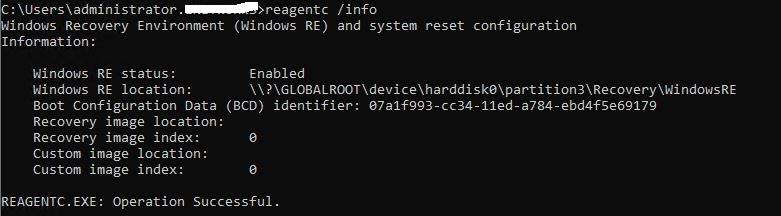
Run the command reagent /info to verify the Recovery partition Image
How to migrate a File Server to another server with the latest operating system.
In this article I am going to explain about a recent project that we took over to migrate a Windows 2003 File Server to Windows 2022 Server.
In the past , we use to perform these kind of migration via manual file transfer , or backup and restore methods. However , Microsoft has released a new feature call Storage Migration Service that could be enabled via Windows Admin Center Web Console(WADC). This tool can be installed in any of the machine or you can install it on the destination file server. The storage migration service will take care of the share and security permission on the destination file server as per the original settings.
After installing the WADC you need to enable the Storage Migration Service extension and reload the interface.
Thereafter , you can configure a migration job by mapping the source and destination file servers. The other benefit is that you can sync the differences to cover the delta or changes after the initial migration. During , the cutover (using the same wizard ) the source file server can be assigned with a different IP and the original IP can be assigned to the new server
For a detailed walk through of the procedure please refer the https://4sysops.com/archives/windows-server-2019-storage-migration-service/.
Good Luck.

The trust relationship between this workstation and the primary domain has failed
Very frequently , you may have faced the above error while trying to login to domain from your PC / Server login. Additionally ,when you review the Event viewer the NETLOGON Event ID 3210 , 130 & 8019 would have been logged as well.
In this case(Incase , if you have credentials for the local administrator).
– Login as Local Administrator
– Open the Powershell
– Run the PS command Test-ComputerSecureChannel ( The output will be false)
This will prove the Secure channel to the AD is broken, unlike earlier , whereas we need to disjoin the workstation/station from the domain and rejoin it , we can use the same PS command to fix the issue.
– Type : $cred=Get-Credential (Enter the username and the password of domain administrator or any user who has rights to add computers to the domain)
– Test-ComputerSecureChannel -Credential $cred -Repair (You will get the output as True).
Restart the computer and everything should be working as normal.
NOTE: – Incase if you skip the credential variable and try to enter the credentials manually , the command will fail.
How to migrate Windows Cluster VMs (incl. RDMs) from old to new storage with minimal downtime?
Recently , we did a storage upgrade for one of our customer. The VM migration was pretty easy for almost 90% of the workloads. However , the remaining 10 % of the VM’s were having RDM disks ,and for the standalone RDM disks (non clustered workloads) we were able to leverage the Storage VMotion to convert the RDM’s to VMDK and migrate it.
On the other hand , for clustered VM’s , Initially we were planning to utilize the RP4VM to migrate the VM’s(Failover to the Replica). But this approach was not fruitful as we faced a compatibility issue and there was no workaround and we dropped the idea.
During this time our colleague from the Storage Team suggested this alternate plan and we tested it and it was successful. The steps are here as listed.
make a note of the RDM mapping to the VMs (note the SCSI ID assigned to the RDM in the VM configuration)
# shutdown the VMs of that Virtual cluster.
# unmap the RDMs.
# Create the Luns on the destination array (must be at least as large as the source !!!)
# present to ESXhost (rescan, …)
# use Storage vMotion to move the VM to the new datastores.(This is to move the VM with the OS disk and any other non RDM based disks)
# use ESX CLI vmkfstools to copy the RDM content to the new lun and this will automatically create the new RDM vmdk pointer file (destination.vmdk)
vmkfstolls -i <srcdisk.vmdk> -d rdmp:device <destination.vmdk>
Example:
vmkfstools -i TestVM_RDM1.vmdk -d rdmp:/vmfs/devices/disks/vml.02000100006006016044440000f8b164674b51e111565241494420 TestVM_NewRDM.vmdk
==== remap the new LUN as RDMp with the same SCSI ID====
=== don’t forget to set the bus sharing if it disappeared===
Source:
Kudos to EricDeWitte1 (Contributor)
The DNS server was unable to open Active Directory”
Recently , One of our customer reported an issue stating that the Exchange Services are failing and Outlook clients are getting disconnected. We noticed few DC related events (Kerberos) on both the exchange servers. Thus , we ran the “netdom query fsmo” command on the 2 Exchange Servers and got the below error:
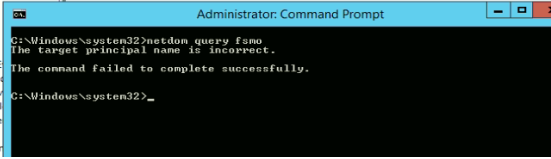
The same error appeared on all the other domain joined servers. Therefore ,we decided to check the DC’s.
When we reviewed the event viewer on the 2 DC’s , there were DNS related errors(Event ID 4000)

Further , we could not open the DNS MMC snap-ins and pinging the hostname by DC was failing as well. However, the DNS service is started state. In addition to this , there were errors on KDC consistency as well. After , troubleshooting for few minutes ,we go hold of the Microsoft KB :https://docs.microsoft.com/en-us/troubleshoot/windows-server/networking/dns-zones-do-not-load-event-4000-4007 and followed the steps mentioned to resolve the issue successfully.
Few points to consider:
– You will find an additional “d: in the word password in the below command. Do not change it.
netdom resetpwd /server: /userd: netdom resetpwd /server: /userd: /passwordd:*
– In my case I had to run this command on the PDC and the other DC as well
– Stop the KDC service prior to running the command.
– First I started on the PDC and restarted it and ensured the DNS snap-in was accessible and the pinging
by hostname was working.
– Finally , I continued the same steps on the remaining domain controllers.
How to check the AD Schema version
We all know , how to check the FFL & DFL version using the AD Snap-ins.However , if you want to check the AD schema version , you need to run regsvr32 schmmgmt.dll to active the MMC snap-in to get the required details.
Most of the time this process will fail and need additional troubleshooting steps. Instead of that , you can use the below PowerShell command to easily get the AD schema version. In the meantime , you could still use the ADSI Edit as well.
Get-ADObject (Get-ADRootDSE).schemaNamingContext -Property objectVersion
Output of the above command will give you a value for the ObjectVersion. This value need to be compared with below to obtain the correct schema version.

Source: https://support.globalsign.com/aeg/aeg-how-check-active-directory-schema-version
How to use KMS based activation for Windows images
Hi All
In our Hosting environment , we had to deploy large number of Windows Servers. We need to ensure that the Windows images are remain active within our datacenters only. As we cannot use MAK based activation. Because , if the customer moves out from us the licenses should be not active . In other words , it is customer responsibility to reactivate the Windows in his new environment.
So we came up with the idea of KMS based activation using VMware Templates and this is how we did it.
- Install the KMS Service on a Windows 2019 and activate it with the KMS Key.
( I am not writing the steps here .Since a simple Google search result will yield lot’s how-to articles on KMS installation.) - Created a Windows 2019 VM.
- Activated the Windows 2019 with the GVLK. You can refer the below URL for the GVLK keys.
https://docs.microsoft.com/en-us/windows-server/get-started/kmsclientkeys - Ran the Sysprep and converted it to a template.
- Thereafter , we created a custom specification file to perform the KMS activation on Windows image. All these settings are mandatory .Otherwise , the KMS commands will fail to run.
+ In the Windows License Page , clear all the settings.

+ In the Administrator Password and set a Password ,
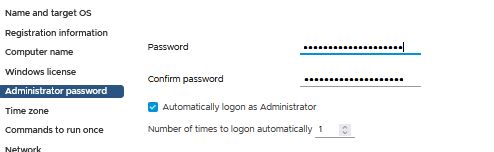
+ In the Commands to run once Page, enter the below commands
cscript c:\windows\system32\slmgr.vbs /skms “kms server ip”:1688
cscript c:\windows\system32\slmgr.vbs /ato

That’s it. Now you can go ahead and deploy the Windows images and get it activated by KMS.
Further reading:
1)Use the below command on your Windows images to verify the CMID(Client Machine ID is not duplicated).
Get-WmiObject -class SoftwareLicensingService | Select-object ClientMachineID
Duplicated CMID will prevent VM’s from getting activated.
2) On the KMS client you can review the below Registry key to verify the correct KMS settings have been applied.
HKLM/SOFTWARE/MICROSOFT/WINDOWSNT/CURRENTVERSION/SOFTWAREPROTECTIONPLATFORM/
–KeyManagementServiceName
–KeyManagementServicePort
3) Use the below commands on the KMS Server & Clients to verify the Windows Activation.
slmgr /dlv
slmgr /dli
DCPromo Fails – The directory service is missing mandatory configuration information
Last week , we worked on a AD migration project. This project involved deploying a Windows 2016 based Domain Controller and then decommission the Windows 2008R2 domain controller.
We successfully transferred the FSMO roles . During the decommissioning process when we ran the dcpromo command we received the error “The directory service is missing mandatory configuration information”
During the troubleshooting the MS KB (https://docs.microsoft.com/en-us/troubleshoot/windows-server/identity/dcpromo-demotion-fails) was pointing us to correct direction. The issue was related to fsmoroleowner attribute on CN=Infrastructure is not set properly. In my case it was pointing to the server which I am trying to demote.
You can see this by opening ADSI Edit;
Right click the ADSI Edit root and click on Connect to…
Use the following connection point: DC=DomainDNSZones,DC=abc,DC=local (Replace it with your actual AD DNS Zone)
Click on Default Naming Context [DC.abc.local] to populate it.
Click on DC=DomainDNSZones,DC=abc,DC=local folder.
Double click on CN=Infrastructure.
Locate the fSMORoleOwner attribute
Ensure you connect to DC=ForestDNSZones as well to verify the attribute.
In my case DomainZones was showing the correct DC .But the ForestDNSZones pointing to the Windows 2008R2 Server.
I have tried the manual method using the ADSI Edit to change the value. However it was failing with the error “The role owner attribute could not be read”
In this case you need to refer the MS KB https://docs.microsoft.com/en-us/troubleshoot/windows-server/identity/dcpromo-demotion-fails to create the .vbs file to fix this issue.( I have seen suggestions to run the dcpromo /forceremoval instead and then run a metadata cleanup. I do not recommend this approach)
The script provided in the KB does not work due to incorrect end statements. Luckily the Blogger veducate.co.uk (https://veducate.co.uk/dcpromo-fails-missing-mandatory-configuration/) have provided a fixed version.
NOTE: You need to run these commands from the current owner of the FSMO roles.
Create a .vbs file via CMD
fsutil file createnew fixfsmo.vbs 0
Copy the below contents to the file
================================================
const ADS_NAME_INITTYPE_GC = 3
const ADS_NAME_TYPE_1779 = 1
const ADS_NAME_TYPE_CANONICAL = 2
set inArgs = WScript.Arguments
if (inArgs.Count = 1) then
‘ Assume the command line argument is the NDNC (in DN form) to use.
NdncDN = inArgs(0)
Else
Wscript.StdOut.Write “usage: cscript fixfsmo.vbs NdncDN”
End if
if (NdncDN <> “”) then
‘ Convert the DN form of the NDNC into DNS dotted form.
Set objTranslator = CreateObject(“NameTranslate”)
objTranslator.Init ADS_NAME_INITTYPE_GC, “”
objTranslator.Set ADS_NAME_TYPE_1779, NdncDN
strDomainDNS = objTranslator.Get(ADS_NAME_TYPE_CANONICAL)
strDomainDNS = Left(strDomainDNS, len(strDomainDNS)-1)
Wscript.Echo “DNS name: ” & strDomainDNS
‘ Find a domain controller that hosts this NDNC and that is online.
set objRootDSE = GetObject(“LDAP://” & strDomainDNS & “/RootDSE”)
strDnsHostName = objRootDSE.Get(“dnsHostName”)
strDsServiceName = objRootDSE.Get(“dsServiceName”)
Wscript.Echo “Using DC ” & strDnsHostName
‘ Get the current infrastructure fsmo.
strInfraDN = “CN=Infrastructure,” & NdncDN
set objInfra = GetObject(“LDAP://” & strInfraDN)
Wscript.Echo “infra fsmo is ” & objInfra.fsmoroleowner
‘ If the current fsmo holder is deleted, set the fsmo holder to this domain controller.
if (InStr(objInfra.fsmoroleowner, “\0ADEL:”) > 0) then
‘ Set the fsmo holder to this domain controller.
objInfra.Put “fSMORoleOwner”, strDsServiceName
objInfra.SetInfo
‘ Read the fsmo holder back.
set objInfra = GetObject(“LDAP://” & strInfraDN)
Wscript.Echo “infra fsmo changed to:” & objInfra.fsmoroleowner
End if
End if
=================================================
Run the file twice as below
1) cscript fixfsmo.vbs dc=forestdnszones,dc=abc,dc=local
2) cscript fixfsmo.vbs dc=domaindnszones,dc=abc,dc=local
Voila , The fsmoroleowner attribute got updated with the correct server name , and I was able to demote the server successfully.
Source: (Helped me to fix the syntax errors on script provided by Microsoft)
DCPromo Fails – The directory service is missing mandatory configuration information
Thanks.
How to install and configure LAPS
Recently , we had to deploy LAPS on one of our client environment. The requirement was to manage the local administrator password of all the domain joined workstations / servers via centrally. I used the below guides to complete the installation .(Kudos to the blog owners)
Source1:
https://scripting.rocks/sysadmin/laps/
Source2:
https://vands.pro/wp-content/uploads/2019/12/step-by-step-guide-to-deploy-microsoft-laps-1.pdf
(via :prajwaldesai.com).
In addition to the above you may come across the below issues.
- Unable to configure the Group Policy using the LAPS Administrator Template or missing LAPS Administrator Templates.
Solution: You need to run the laps installation on the DC and remove all the options and select only ” GPO editor templates” - Manual Password reset via Fat Client / Command Line is not working.
Solution : You need to run the GPupdate after the manual password reset on the computer where you are changing the password.
Good Luck.
How to Track File Deletion on a File Server
Hi Folks
Anybody wants to enable auditing on their file server , for the purpose of tracking and auditing who has deleted any files or folders , I would recommend the below article.
It covers detailed steps on how to enable the Group Policy for auditing and enabling Folder level Auditing parameters. However after enabling the required configuration you need to filter out for the event ID’s 4663,4624,5140, and 4660 in the Security Event Log.
These event ID’s will provide the audit trail for the event.
