Posts filed under ‘Nutanix’
How to migrate a Exchange DAG using Nutanix MOVE.
We recently moved 2 Exchange servers part of a DAG using the Nutanix MOVE. The source environment was VMware ESXi (VMware ESXi, 7.0.3, 23794027) and the target environment was AHV 10.3.0.2. I am sharing the steps we followed below to help fellow techs who may come across a similar requirement.
Started the process as below:
- RE-directed all the client and SMTP traffic to another node.
- Put the 1st Exchange node in the maintenance mode.
- Created a Nutanix MOVE job to migrate the Exchange server on the maintenance mode.
- After verifying all the Exchange services are up and running , and the client & SMTP traffic is working fine (including the DAG replication ) , We moved forward with the remaining node with the same steps.
I can confirm that the above approach helped us to migrate our Exchange DAG environment from VMware to Nutanix AHV successfully.
How to view the Network Configuration in AHV
Use the following commands to view the configuration of the network elements.
Before you begin
Log on to the Acropolis host with SSH.
Procedure
- To show interface properties such as link speed and status, log on to the Controller VM, and then list the physical interfaces.
nutanix@cvm$ manage_ovs show_interfaces
Output similar to the following is displayed:
name mode link speed
eth0 1000 True 1000
eth1 1000 True 1000
eth2 10000 True 10000
eth3 10000 True 10000
- To show the ports and interfaces that are configured as uplinks, log on to the Controller VM, and then list the uplink configuration.
nutanix@cvm$ manage_ovs –bridge_name bridge show_uplinks
Replace bridge with the name of the bridge for which you want to view uplink information. Omit the –bridge_name parameter if you want to view uplink information for the default OVS bridge br0.Output similar to the following is displayed:
Bridge: br0
  Bond: br0-up
    bond_mode: active-backup
    interfaces: eth3 eth2 eth1 eth0
    lacp: off
    lacp-fallback: false
    lacp_speed: slow
- To show the bridges on the host, log on to any Controller VM with SSH and list the bridges:
nutanix@cvm$ manage_ovs show_bridges
Output similar to the following is displayed
Bridges:
br0
- To show the configuration of an OVS bond, log on to the Acropolis host with SSH, and then list the configuration of the bond.
root@ahv# ovs-appctl bond/show bond_name
For example, show the configuration of bond0.
root@ahv# ovs-appctl bond/show bond0
Output similar to the following is displayed:
---- bond0 ----
bond_mode: active-backup
bond may use recirculation: no, Recirc-ID : -1
bond-hash-basis: 0
updelay: 0 ms
downdelay: 0 ms
lacp_status: off
active slave mac: 0c:c4:7a:48:b2:68(eth0)

slave eth0: enabled
        active slave
        may_enable: true

slave eth1: disabled
        may_enable: false
How to fix the disk usage warning when /home partition or /home/nutanix directory is full
Source: https://portal.nutanix.com/page/documents/kbs/details?targetId=kA0600000008dpDCAQ
Summary:
This article describes ways to safely free up space if /home or /home/nutanix becomes full or does not contain enough space to facilitate an AOS upgrade or PCVM upgrade.
Versions affected:
ALL Prism Central Versions, ALL AOS VersionTroubleshootingUpgrade
Description:
WARNING: DO NOT treat the Nutanix CVM (Controller VM) or PCVM as a normal Linux machine. DO NOT perform “rm -rf /home” on any of the CVMs or PCVM. It could lead to data loss scenarios. Contact Nutanix Support in case you have any doubts.
This condition can be reported in two scenarios:
- The NCC health checkdisk_usage_check reports that the /home partition usage is above a certain threshold (by default 75%)
- The pre-upgrade check test_nutanix_partition_space checks if all nodes have a minimum of 5.6 GB space on the /home/nutanix directory before performing an upgrade
The following error messages will be generated in Prism by the test_nutanix_partition_space pre-upgrade check:
Not enough space on /home/nutanix directory on Controller VM [ip]. Available = x GB : Expected = x GB
Failed to calculate minimum space required
Failed to get disk usage for cvm [ip], most likely because of failure to ssh into cvm
Unexpected output from df on Controller VM [ip]. Please refer to preupgrade.out for further information
Nutanix reserves space on the SSD-tier of each CVM for its infrastructure. These files and directories are located in the /home folder that you see when you log in to a CVM. The size of the /home folder is capped at 40 GB so that the majority of the space on SSD is available for user data.
Due to the limited size of the /home partition, it is possible for it to run low on free space and trigger Prism Alerts, NCC Health Check failures or warnings, or Pre-Upgrade Check failures. These guardrails exist to prevent /home from becoming completely full, as this causes data processing services like Stargate to become unresponsive. Clusters with multiple CVMs having 100% full /home partition will often result in downtime for user VMs.
The Scavenger service running on each CVM is responsible for the automated clean-up of old logs in /home and improvements to its scope were made in AOS 5.5.9, 5.10.1, and later releases. For customers running earlier AOS releases, or in special circumstances, it may be necessary to manually clean up files out of certain directories in order to bring space usage in /home down to a level that will allow future AOS upgrades.
When cleaning up unused binaries and old logs on a CVM, it is important to note that all the user data partitions on each drive associated with a given node are also mounted within /home. This is why we strongly advise against using undocumented commands like “rm -rf /home”, since this will also wipe the user data directories mounted within this path. The purpose of this article is to guide you through identifying the files that are causing the CVM to run low on free space and removing only those which can be safely deleted.
Solution:
WARNING: DO NOT treat the Nutanix CVM (Controller VM) as a normal Linux machine. DO NOT perform “rm -rf /home” on any of the CVMs. It could lead to data loss scenarios. Contact Nutanix Support in case you have any doubts.
Step 1: Parsing the space usage for “/home”.
Log in to CVM, download KB-1540_clean_v7.sh to /home/nutanix/tmp directory, make it executable and run it.
KB-1540_clean_v7.sh has some checks (MD5, compatibility, etc.) and deploys KB-1540_clean_v7.sh script accordingly.
nutanix@cvm:~$ cd ~/tmp
nutanix@cvm:~/tmp$ wget http://download.nutanix.com/kbattachments/1540/KB-1540_clean_v7.sh
nutanix@cvm:~/tmp$ mv KB-1540_clean_v7.sh KB-1540_clean.sh
nutanix@cvm:~/tmp$ chmod +x KB-1540_clean.sh
nutanix@cvm:~/tmp$ ./KB-1540_clean.sh
You can select to deploy the script to the local CVM or all CVMs.
========
Select package to deploy
     1 : Deploy the tool only to the local CVM
     2 : Deploy the tool to all of the CVMs in the cluster
    Selection (Cancel="c"):
Run the script to get a clear distribution of partition space usage in /home.
nutanix@cvm:~/tmp$ ./nutanix_home_clean.sh
Step 2: Check for files that can be deleted from within the list of approved directories.
PLEASE READ: The following are the ONLY directories within which it is safe to remove files. Take note of the specific guidance for removing files from each directory. Do not use any other commands or scripts to remove files. Do not use “rm -rf” under any circumstances.
- Removing Old Logs and Core Files Before removing old logs, check to see if you have any open cases with pending RCAs (Root Cause Analysis). The existing logs might be necessary for resolving those cases and you should check with the owner from Nutanix Support before cleaning up /home. Only delete the files inside these directories. Do not delete the directories themselves.
- /home/nutanix/data/cores/
- /home/nutanix/data/binary_logs/
- /home/nutanix/data/ncc/installer/
- /home/nutanix/data/log_collector/
- Removing Old ISOs and Software Binaries Begin by confirming the version of AOS that is currently installed on your cluster by running the command below. Make sure never to remove any files that are associated with your current AOS version. You will find this under the “Cluster Version” field in the output of the command shown below. nutanix@cvm:~$ ncli cluster info Example output: Cluster Name : Axxxxa Cluster Version : 5.10.2 Only delete the files inside these directories. Do not delete the directories themselves.
- /home/nutanix/software_uncompressed/ – Delete any old versions other than the versions you are currently upgrading. The software_uncompressed folder is only in use when the pre-upgrade is running and should be removed after a successful upgrade. If you see a running cluster which is currently not upgrading, it is safe to remove everything underneath software_uncompressed
- /home/nutanix/foundation/isos/ – Old ISOs of hypervisors or Phoenix.
- /home/nutanix/foundation/tmp/ – Temporary files that can be deleted.
Step 3: Check space usage in /home to see that it is now below 70%.
You can use the “df -h” command to check on the amount of free space in /home. To accommodate a potential AOS upgrade, usage should ideally be below 70%.
nutanix@cvm:~$ allssh "df -h /home"
Example output:
================== x.x.x.x =================
/dev/md2         40G  8.4G   31G  22% /home
================== x.x.x.x =================
/dev/md2         40G  8.5G   31G  22% /home
================== x.x.x.x =================
/dev/md2         40G   19G   21G  49% /home
Cleaned up files from the approved directories but still see high usage in /home?
Contact Nutanix Support and submit the script log bundle (/tmp/home_kb1540_<cvm_name>_<timestamp>.tar.gz). One of our Systems Reliability Engineers (SREs) will promptly assist you with identifying the source of and solution to the problem at hand. Under no circumstances should you remove files from any other directories aside from those found here as these may be critical to the CVM infrastructure or may contain user data.
For the home partition exceeding its limit on the PCVM refer to the KB-8950 to troubleshoot.
How to re-configure /configure IPMI using ipmitool in ESXi
This post covers the steps needed to assign / change IP address for IPMI without logging in to IPMI Portal or restarting the server. The tool we are going to use is ipmitool builtin to ESXi.
To get the current IPMI IP Details
#/ipmitool lan print 1
[root@esxi]# /ipmitool lan set 1 ipsrc static
[root@esxi]# /ipmitool lan set 1 ipaddr x.x.x.x
Setting LAN IP Address to x.x.x.x
[root@esxi]# /ipmitool lan set 1 netmask x.x.x.x
Setting LAN Subnet Mask to x.x.x.x
[root@esxi]# /ipmitool lan set 1 defgw ipaddr x.x.x.x
Setting LAN Default Gateway IP to x.x.x.x
[root@esxi]# /ipmitool lan set 1 defgw macaddr xx:xx:xx:xx:xx:xx
Setting LAN Default Gateway MAC to xx:xx:xx:xx:xx:xx
[root@esxi]# /ipmitool lan set 1 arp respond on
Enabling BMC-generated ARP responses
[root@esxi]# /ipmitool lan set 1 snmp public
Setting LAN SNMP Community String to public
Change the IPMI Password
[root@esxi]# /ipmitool user list (Note down the user ID in mycase it is 2)
[root@esxi]# /ipmitool user set password 2
[root@esxi]# /ipmitool lan set 1 access on
Update1:
To recreate the SSL certificate(Incase if the IPMI Page self-signed certificate is expired
./ipmitool raw 0x30 0x68 0x0
Source:https://portal.nutanix.com/#page/kbs/details?targetId=kA0600000008db6CAA
How to download ISO/Disk Images from Nutanix Image Service.
Hi Folks
Unlike VCenter , there is no straightforward method to download the ISO’s or Disk Images you have uploaded to the Image Service.(In VCenter , you could perform both upload / download files from the datastore).
In Nutanix AHV , you need to run the below commands to achieve the same results.(As per Nutanix , this need to be done , under Nutanix Support only).
#Login to any of the CVM.
# nuclei image.list —-> This will list all the images with the UUID
###### EXAMPLE OUTPUT ######
Name UUID State
MyISO yyyyyyyyyyyyyyyyyyyyyyyyyyyyyy COMPLETE
###### EXAMPLE OUTPUT ######
# nuclei image.get yyyyyyyyyyyyyyyyyyyyyyyyyyyyyy –> Get the Cluster UUID.
###### EXAMPLE OUTPUT ######
current_cluster_reference_list:
– kind: cluster
uuid: xxxxxxxxxxxxxxxxxxxxxxxxxxxxxxx
###### EXAMPLE OUTPUT ######
# ncli multicluster get-cluster-state | grep -C5 <xxxxxxxxxxxxxxxxxxxxxxxxxxxxxxx> –> This will get the cluster name:
###### EXAMPLE OUTPUT ######
Cluster Id : xxxxxxxxxxxxxxxxxxxxxxxxxxxxxxx
Cluster Name : MYCLUSTER
Is Multicluster : false
Controller VM IP Addre… : [x.x.x.x. …………………………………….]
External or Masqueradi… : y.y.y.y (Cluster IP)
###### EXAMPLE OUTPUT ######
NOTE : The above commands are used , when you are managing multiple cluster via PC , and you need to locate the image and in which cluster the image is stored.
Thereafter , run the below command from your workstation (You must have curl installed , and the command must be run from the bin folder , where the curl is installed)
curl-7.68.0-win64-mingw\bin>curl -k -u admin -X GET –header “Accept: application/json” “https://y.y.y.y.:9440/api/nutanix/v3/images/ac799
d52-60e3-448f-a0f9-d4de756b0d01/file” –output SQL.iso
Update1: The Curl command syntax has been updated.
Nutanix Command Library
I have decided to write this post to record all the Nutanix commands that we rarely use in our routine work , But essentially important for better understanding the environment. All these commands can be run from any CVM , unless I will be specifying it.
How to identify the Acropolis Master in an AHV Cluster.
# links -dump http:0:2030
How to identify the Prism Leader
# curl http://0:2019/prism/leader && echo
How to disable/enable the HA on a VM.(By default all the VM’s are protected with HA .
+ Login to CVM and then type “acli”
# vm.update “VM Name” ha_priority=-1 ( To disable the HA)
# vm.update “VM Name” ha_priority=0 ( To enable the HA)
# vm.get “VM Name” – To confirm the change. But by default , you will not see the field ha_priority parameter unless you disable and then enable it manually.
How to find out the BIOS version on all the hosts.
# in the CVM
for i in hostips; do echo ESX $i ; ssh root@$i ‘smbiosDump | head | grep
Version’ 2>/dev/null ; done
How to enable EVC when VCenter Server is running on VM in a Nutanix Cluster
As part of the Nutanix best practices we need to enable the EVC on the VSphere Cluster. In that sense , when the VCenter Server it self a VM , you will be dragged in to a chicken and egg situation. Because , when a host contains powered on VM , you will not be able to add the host to the EVC enabled Cluster. Thus , to overcome this condition , you could follow the below guidelines. (You may need to disable the Admission Control temporarily and enable it again until you finish all the steps)
1) Add the hosts to the DataCenter .
2) Create the HA / DRS Cluster .
3) Enable EVC on the cluster based on your processor architecture.
4) Pick up any host and shutdown the running VM’s and the CVM ( Please keep in mind , you can shutdown only one CVM at a time).
5) Then drag & drop the host to the Cluster , the host will be added to the cluster without any hassle.
6) Power on the VM’s and the CVM ( wait till the CVM completes the boot)
7) Now , VMotion the VCenter VM to the host which is part of the Cluster already.
8) That’s it repeat steps 4 ,5 & 6 for the remaining hosts.
Hint:
# In case if you have forgotten to enable EVC before you put the Cluster in to production , and now you are in a situation , that you need to expand your Nutanix Cluster and enabling EVC becomes mandatory to add the new nodes to the existing ESXi cluster.In this case , you could do the additional steps given below to achieve the intended result. ( Again , you may need to disable the Admission Control temporarily and enable it again until you finish all the steps)
1) Create a new Cluster (without EVC)
2) Select a host and VMotion all the Production VM’s running on that host to other remaining hosts.
3) Shutdown the CVM
4) Put the host on to the Maintenance Mode
5) Drag and Drop the host to the new Cluster
6) Exit from the Maintenance Mode & Power on the CVM.
7) Then VMotion the VCenter VM & Other VM’s to this host.
8) Do the steps 2 – 6 for other remaining hosts.
9) Reconfigure your old cluster with proper EVC mode.
10) Then repeat 2 – 6 for all the hosts.
Source :
Refer https://www.virten.net/2013/04/intel-cpu-evc-matrix/ for the guidelines on EVC modes
Video Reference : https://www.youtube.com/watch?v=DSfzafr1ndA
Latency between the Nutanix CVM’s
Recently we noticed the Prism was throwing an error stating that there is latency between CVM’s . To investigate the issue we raised a support call with the Nutanix Team. I am sharing the procedures followed by the Nutanix Team as it may help somebody who are facing a similar issue.
# Login to Controller VM
# cd ~nutanix/data/logs/sysstats (This location will contain the ping_hosts & ping_gateway logs)
# tailf ping_hosts.INFO
In our case we noticed there was unreachable on one of the CVM’s
x.x.x.1 : 0.187 ms
x.x.x.2 : Unreachable
x.x.x.3 : 0.028 ms
So we consulted the Network Team and found out that the Switch port where one of the node is connected , conatined lots of errors and we had to replace the cable.
That’s it the problem got resolved.
Nutanix: fatal mounting installer media
Last week , we were doing the foundation on NX-1365-G6 block. The foundation process hangs at 26% with error fatal mounting installer media. When this happens, the Nutanix nodes are being powered off. I have attached 2 screenshots below that depicts the problem we faced.
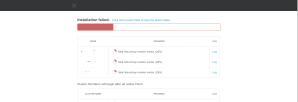
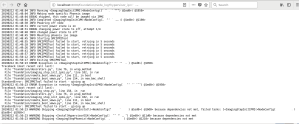
You could see it in the images , that the IPMITool is trying to restart the server and failing to do so.
Therefore , to overcome this situation , we logged in to IPMI on each node and did a Uni Reset & Factory Default via the Maintenance Menu. Thereafter we restarted the foundation from scratch and it got completed successfully.
Nutanix AOS Upgrade Tips
Recently we were upgrading our Nutanix Cluster which was running an AOS version 4.5.2.3 to the latest 5.9. The process was seamless and non interruptive. I have listed the commands we have used along with Nutanix Engineer during the process for future reference.
Initial Check prior to AOS Upgrade
- ncli cluster info
- ncli host ls
- ncli ru ls
- ncli ms ls
- ncc –version
- cluster status | grep -v UP
- nodetool -h 0 ring | grep -i normal | wc -l
- svmips | wc -w
Once the output of above checks are fine Use the Software Upgrade feature from PRISM to upgrade the AOS.
To check the upgrade / pre-upgrade status and on which node is being picked up.& Confirm the versions after upgrade
- allssh ls -ltra ~/data/logs | grep -i preupgrade
- tail -F ~/data/logs/preupgrade.out
- use upgrade_status (to verify the status , less verbose mode)
- ncli –version
- stargate –version
- watch -d genesis status (to check the services status after the CVM reboot)
Optional: To delete the previously uploaded ISO
- cd ~/software_downloads/nos ( use it with allssh to run it on all the CVM’s)
Finally after AOS upgrade sometime the curator replication process and it takes some time to complete . Until it completes we cannot proceed with the other update , thus you could check via the below command;
- curator_cli get_under_replication_info