How to migrate a Exchange DAG using Nutanix MOVE.
We recently moved 2 Exchange servers part of a DAG using the Nutanix MOVE. The source environment was VMware ESXi (VMware ESXi, 7.0.3, 23794027) and the target environment was AHV 10.3.0.2. I am sharing the steps we followed below to help fellow techs who may come across a similar requirement.
Started the process as below:
- RE-directed all the client and SMTP traffic to another node.
- Put the 1st Exchange node in the maintenance mode.
- Created a Nutanix MOVE job to migrate the Exchange server on the maintenance mode.
- After verifying all the Exchange services are up and running , and the client & SMTP traffic is working fine (including the DAG replication ) , We moved forward with the remaining node with the same steps.
I can confirm that the above approach helped us to migrate our Exchange DAG environment from VMware to Nutanix AHV successfully.
How to offboard Exchange Online Mailboxes to Exchange On-Prem using Exchange Hybrid Environment
Recently , we had a project to offboard Exchange Online Mailboxes to On-Prem Exchange. In this environment customer already have Entra Connect Server. I would like to share the steps we followed during the project so it could be referred by anybody who is having a similar requirements.
However , I am not going to list out any commands here as it is freely available in many web sites.
- First we deployed Exchange On-Prem Server and completed all the configuration like DAG , Connector etc.
- Then we deployed the Exchange hybrid Configurations with Centralized Mail Transport.
- All the autodiscover,MX and other Exchange related DNS records were re-pointed to Exchange On-Prem Public IP’s.
- Created a TestMailbox in Exchange On-Prem and tested the email flow.
– Email sent to Exchange On-Prem Mailbox from Outside delivered successfully.
– Email sent to ExchangeOnline Mailbox from outside bounced back with an error user not found in the organization.
– Email tests sent from Exchange On-Prem to Exchange Online and vice versa failed. - After troubleshooting we found out the Exchange Online mailboxes were not visible on Exchange-On-Prem ECP. Further troubleshooting revealed that the AD user attribute for the AD synced users does not have Remote Routing Address.(e.g testdomain.mail.onmicrosoft.com)
- So we decided to do a bulk update of all the users to populate their Remote Routing Address.(You must do a Delta AD Sync after this process). Thereafter , we were able to see all the Exchange Online Mailboxes in the Exchange On-Prem ECP.
- Tested all the email scenarios and confirmed everything is working fine.
- The other obstacle we faced is that , when an email sent from Exchange Online Mailboxes to outside world the relaying was denied by the Exchange On-Prem server.Even though , we believed the default FrontEnd receive connector in Exchange On-Prem had all the requirement for this, we ended up creating a new Receive Connector and added all the Exchange Online IP’s to allow the email relay and resume the e-mail flow.
Hope it helps some one who is struggling to find a proper article for similar scenario. In case , if you want to reach out to me for detailed steps like commands used for bulk import/export/AD properties update , please feel free to reach out to me.
How to check if an AD account’s password is valid
Dear Folks
When we perform large scale user creation or migration in AD environment , we look for a way to verify the exported passwords are working fine. Most of the time , we rely on a domain joined computer to login with the AD user and verify the credentials are correct or not.
However , There is a better way to do this test from the Domain Controller itself using a PS script.
The Script.
====================================================================
$cred = Get-Credential #Read credentials
$username = $cred.username
$password = $cred.GetNetworkCredential().password
# Get current domain using logged-on user’s credentials
$CurrentDomain = “LDAP://” + ([ADSI]””).distinguishedName
$domain = New-Object System.DirectoryServices.DirectoryEntry($CurrentDomain,$UserName,$Password)
if ($domain.name -eq $null)
{
write-host “Authentication failed – please verify your username and password.”
exit #terminate the script.
}
else
{
write-host “Successfully authenticated with domain $domain.name”
}
====================================================================
Source:http://serverfault.com/questions/276098/check-if-user-password-input-is-valid-in-powershell-script
How to automatically sign the RRSIG in DNSSEC Zones.
For those who are working with CRON jobs would have realized that */20 for the day place holder in crontab , will be taking the Calendar Days only or in other words 20th of Every month. However , my requirement was to run a batch job every N days since the last run. After several hours of Googling I came across this Blog (https://backreference.org/2013/08/25/run-cron-job-every-n-days/index.html.) which do exactly what I was looking for.
In this post , I will leverage this approach to renew my RRSIG once in every 25 days. Below is the extract from the original website.
====================================================================
Let’s say we want to run a job every N days, or weeks, regardless of month or year boundaries. For example, once every three tuesdays, or once every 17 days, or whatever.
Cron itself (at least the variants I have access to) has no way to specify these time periods, so it would seem this could not be done.
But there’s a simple way to do it. It is based on modular arithmetic and on the fact that we know that measurement of time on Unix starts on a concrete date, which is the well-known January the 1st, 1970 (also known as “the Epoch”). For the remainder, I’m assuming UTC and a running time of midnight for simplicity; it should be easy to consider the appropriate time differences where needed.
With this kind of requirement we need to have an actual starting date for the job, that is, when it has to run for the first time, so we can use it as a starting point for the “every N days” intervals.
Once we have an actual date of first execution for our task (say, 2013-01-15, a Tuesday, at 00:00), we can divide the time passed since the Epoch until our date into groups of N days. For this first example, let’s say N == 14, two weeks. With the following calculation we can see which place our starting day occupies in a period of 14 days (two weeks):

Dividing by 86400 gives the number of days passed since the Epoch, from which the modulo 14 is calculated. The result is 11, which tells us that at any given time, performing the above calculation using the current date will yield 11 only on $startdate, of course, and on every second Tuesday (well, every 14 days, which is the same) starting from $startdate (or going backwards from $startdate, which is not important here). Simple test code to show that it’s true:

Sample run:
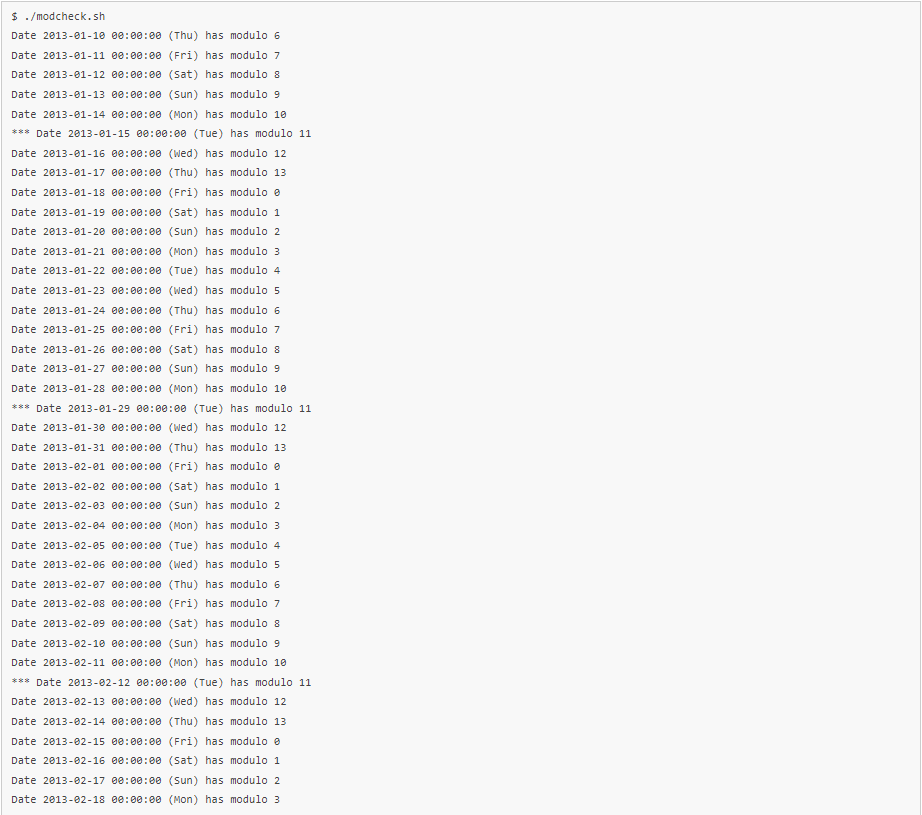
So there we have it, every second Tuesday starting from 2013-01-15. The code shown in modcheck.sh can be made generic so that values can be passed from the command line:

Another test: let’s say we want every fifth day starting from 2012-12-02. Let’s calculate the modulo first:

And let’s verify it:

So to use all this in our crons, we need to know the starting date, the frequency (every N days) and calculate the modulo. Once the modulo is known, we run the job if the modulo calculated for “now” (when the job is invoked) matches the modulo we want. So for instance if the period is 13 days and the modulo we want is 6, in our script we do:

Or as usual it can also be done in the crontab itself so the script does not need to have special knowledge (it may not even be a script, so in that case the check would have to be external anyway):

Note: so far, it doesn’t seem to have trouble with DST time changes. Corrections welcome.
====================================================================
Below is a screenshot of my Crontab , I am using to resign the RRSIG once in 25 Days.

That’s it and Let me know your thoughts in the comments section.
Move Exchange mailbox FailedOther stops at 95%
When migrating mailboxes to the newer server , the process may stop or fails at 95% with the message FailedOther.
In these cases ensure you have not set any quota on the target database or other settings. If every thing looks ok and still the migration is failing , you could use the below commands to resolve the failure
Firstly , remove the failed move request
Get-MoveRequest -Identity “Failed Mailbox ID” | Remove-MoveRequest
Then run
New-MoveRequest -Identity “Failed Mailbox ID” -TargetDatabase “DB” -BadItemLimit “200” -AcceptLargeDataLoss
That’s it you could see now the mailbox migration has completed successfully.
Unable to move mailboxes via ECP/EAC
When you are migrating from Exchange 2013 to Exchange 2019 you may notice that you are not able to migrate the mailboxes from the Exchange 2013 to Exchange 2019 via the EAC.
The workaround in this situation is to use the New-MoveRequest or New-MigrationBatch Exchnage Powershell commands. Even though , when you these commands the move request may fail in some cases and may not appear in the EAC. You could refer MS articles on how to create the CSV for migration batches and use it with these command line tools.
In breif:
- Create a CSV file using the EAC

Then modify the CSV file as below:

Run the below commands to initiate the migration and get the statistics
New-MigrationBatch –Name –CSVData ([System.IO.File]::ReadAllBytes(“”)) –Local –TargetDatabase
Get-MigrationUser | Get-MigrationUserStatistics
Let’s go back to the original problem and let’s see how can we fix it. You need to find out the System Mailboxes (especially the Migration mailbox) from the older version of Exchange server and transfer it to a database in the newer version of exchange.
Get-Mailbox -Server “OLD Exchange Server ” -Arbitration | New-MoveRequest -TargetDatabase “”Database in the Newer Exchange”
That’s it you can happily use the EAC to migrate the mailboxes.
The public folder database ‘Public Folder Database 0206806109″ cannot be deleted
If you are migrating from an earlier version of Exchange to a newer version , you may come across a situation where you are not able to decommission the old exchange server due to the inability to delete the Public Folder databases with the below error message.
Public Folder Database 0206806109
Failed
Error:
The public folder database “Public Folder Database 0206806109” contains folder replicas. Before deleting the public folder database, remove the folders or move the replicas to another public folder database. For detailed instructions about how to remove a public folder database, see http://go.microsoft.com/fwlink/?linkid=81409&clcid=0x409.
You may opt to use the ADSI edit to forcibly delete the Public folder. But , I would not recommend this approach as the ADSI Tool there is no error check or validation is performed.
You can use the below powershell commands to safely delete the replicas of the remaining Public folders and System public folders after ensuring all the needed Public Folders are migrated to the new exchange servers.
Get-PublicFolder-ServerExch-2010 "\NON_IPM_SUBTREE"-Recurse-ResultSize:Unlimited | Remove-PublicFolder-ServerExch-2010-Recurse-ErrorAction:SilentlyContinue
Now you could remove the Publice folder dataabsae
Remove-PublicFolderDatabase “Public Folder Database 0206806109”
Source:https://blog.rmilne.ca/2020/09/30/unable-to-remove-exchange-2010-public-folder-database/
Windows server 2022 – Cannot extend C: partition
Those who are installing new Windows 2022 server , may realize that the C: drive cannot be extended . This is due to the recovery partition is created next to the C: drive.

Most of the google search references pointing out to use a 3rd party tool to modify the disk or delete the recovery partition via diskpart utility using the override switch and then extend the C: drive. However , This deletion will lead you to a situation you lose the recovery partition and unable to recover the server via the recovery media or similar methods. Thus I would recommend the below approach to safely transfer the recover partition to C: drive after deleting the original recovery partition.
Step1: Mount the Windows 2022 Image to the C:\Temp folder
DISM /Mount-image /imagefile:D:\sources\install.wim /Index:1 /MountDir:C:\temp/readonly /optimize
Step2: Transfer the recovery media to C: drive
robocopy /MIR C:\temp\Windows\System32\Recovery\ C:\Windows\System32\Recovery
Step3 : Set the recovery partition to C:\Windows\System32\Recovery
reagentc /setreimage /path C:\Windows\System32\Recovery
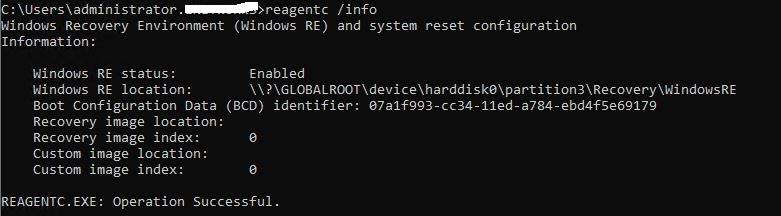
Step4: Unmount the Windows 2022 Image and verify the recovery partion status
Dism /Unmount-image /MountDir:C:\temp /discard
Run the command reagent /info to verify the Recovery partition Image
How to install a wildcard SSL certificate on the Splunk Web
Hi Guys
If you come across a situation where you need to install / renew a wildcard certificate (*.local.test.net) on the Splunk Web Instance you can follow the below guidelines .The main purpose of this guide is to help fellow splunk engineers on a similar situation. Since , I did not find a proper guide neither in Splunk Portal nor via the Google searches. ,
- If it is a standard SSL certificate please follow the detailed splunk guide line https://docs.splunk.com/Documentation/Splunk/8.2.4/Security/Getthird-partycertificatesforSplunkWeb
- In case if you want to convert it to crt to pem format use the command line “openssl x509 -in cert.crt -out cert.pem”
- My commands are based on openssl utility in a Linux Server.
- Already a CSR has been created on another server (a Windows Server) and the wildcard certificate has been obtained from the SSL vendor .Thereafter ,we have installed certificate on that Server and then exported the SSL certifcate(as .pfx format with the private key) to be imported to all other servers including our Splunk Server.
Now let’s go in to the steps
- Do not create a seperate private key as quoated in the above guide. No need to create a CSR on the Splunk Server as well.
- Copy the Intermediate Root certificate to the Splunk Server and convert it to a pem
openssl x509 -in MyRoot.crt -out MyRoot.pem - Copy the .pfx file to the Splunk Server and extract the private key. , and when it prompts for the password , Enter the password you entered when you created /exported the pfx certificate
#openssl pkcs12 -in certificate.pfx -out privatekey.key -nocerts -nodes - Now extract the Server Key certificate ,and and when it prompts for the password , Enter the password when you created /exported the pfx certificate
#openssl pkcs12 -in certificate.pfx -out certificate.pem -nokeys -clcerts - Now you can verify the MD5 hashes for the above using the below commands. It must match.
#openssl x509 -noout -modulus -in certificate.pem |openssl md5
#openssl rsa -noout -modulus -in privatekey.key |openssl md5
The final step is to combine the server certificate and the root certificate in to a single .pem file.
# cat certificate.pem MyRoot.pem >> MySplunkWebCert.pem
That’s it , now you can point the privatekey.key and MySplunkWebCert.pem(The combined one which will include the Server Certifcate and the Root Certificate) as per the guidelines https://docs.splunk.com/Documentation/Splunk/8.2.4/Security/SecureSplunkWebusingasignedcertificate
NOTE : I have not focused on the paths and the file names . so please ensure you add the file paths and the names according to your environment.
Source:
https://trustzone.com/knowledge-base/split-pfx-file-into-pem-key-files-openss-windows-linux/
How to migrate a File Server to another server with the latest operating system.
In this article I am going to explain about a recent project that we took over to migrate a Windows 2003 File Server to Windows 2022 Server.
In the past , we use to perform these kind of migration via manual file transfer , or backup and restore methods. However , Microsoft has released a new feature call Storage Migration Service that could be enabled via Windows Admin Center Web Console(WADC). This tool can be installed in any of the machine or you can install it on the destination file server. The storage migration service will take care of the share and security permission on the destination file server as per the original settings.
After installing the WADC you need to enable the Storage Migration Service extension and reload the interface.
Thereafter , you can configure a migration job by mapping the source and destination file servers. The other benefit is that you can sync the differences to cover the delta or changes after the initial migration. During , the cutover (using the same wizard ) the source file server can be assigned with a different IP and the original IP can be assigned to the new server
For a detailed walk through of the procedure please refer the https://4sysops.com/archives/windows-server-2019-storage-migration-service/.
Good Luck.

