Posts filed under ‘Windows’
Additional Permissions needed for a Service Account to Reset and Change AD passwords and Unlock AD Accounts.
In some scenarios we had to delegate the permission for a Junior Administrator to do some AD related tasks ,for example change/reset the AD user password , Unlock user account , etc. In this case most of the articles I have googled and referred pointing only to enable the
“Reset user passwords and force password change at next logon “. But what I realized is that this alone will not grant your the required permission.
Thus additionally you need to add a custom level delegation as provided below;
- Create a custom task to delegate and click Next.
- Select Only the following objects in the folder from the Delegate control of option.
- Select the User objects option as the object to which to delegate.
Click Next to proceed.(Ensure Property-specific is selected.) - Scroll down to select the Read lockout Time and Write lockout Time.
- Review the changes and click next to complete the wizard.
Please note that I have not listed any detailed steps on how to create the delegation rules as there are plenty of articles available on the Internet that provides a very descriptive guidelines along with the screenshots.
SYSVOL Replication Error on Windows 2012 R2
Hi Guys
Recently we migrated one of our customer’s active directory domain controllers to a virtualized environment. During the DC migration my colleague noticed that the SYSVOL and NETLOGON folders are not replicating it’s contents from the existing domain controller. Thus he copied the contents manually. But after some time client started reporting error like;
- The Group Policy is not getting updated or Propagated to all the workstations / users.
- Logon Scripts stopped working.
Thus when we digged in to the problem we were able to track down the issue to DFSR based sysvol replication, Most importantly the old DC was not replicating for almost 1300 days approximately(Figure.1) The below event ID’s helped us to track down the issue:


So when we started troubleshoot we tried to ran the commands stated in the Eventviewer(refer attached file) but no avail.
Also we ran the below command
For /f %i IN (‘dsquery server -o rdn’) do @echo %i && @wmic /node:”%i” /namespace:\\root\microsoftdfs path dfsrreplicatedfolderinfo WHERE replicatedfoldername=’SYSVOL share’ get replicationgroupname,replicatedfoldername,state
(In case if you ran in to an error when running the above command it could be due to the ‘ is get changed to ` when copying and pasting it. Thus change it manually)
Strangely the status on all the server showing 2 which is Initial Sync. (One of the reason for the problem) .Also in our MaxOfflineTimeInDays more than 1000 days. But
By default in Windows the is set to 60 Days. In our case we need to extend it upto 1800 days where there was an offset of more than 1000. so we ran the command to force the servers to allow the content freshness for more than 1000 days.
wmic.exe /namespace:\\root\microsoftdfs path DfsrMachineConfig set MaxOfflineTimeInDays=1800
(Do not forget to bring it back the original value of 60 Days)
But sill no avail. Then we decided to Authoritative restore of the SYSVOL folders. We ran the below command set which were extracted from the MS KB:https://support.microsoft.com/en-us/help/2218556/how-to-force-an-authoritative-and-non-authoritative-synchronization-fo)
Do this step on the PDC Emulator Role
Stop the DFSR Service
#net stop dfsr
Open the ADSIEDIT.MSC tool, connect to the “Default Naming Context” and move to OU=Domain Controllers” and select the PDC Emulator –> CN=SYSVOL Subscription,. Right click on CN=Domain System Volume and go to Properties(preferably the PDC Emulator, which is usually the most up to date for SYSVOL contents): and modify the following DN and two attributes
msDFSR-Enabled=FALSE
msDFSR-options=1
Modify the following DN and single attribute on all other domain controllers in that domain:(Using the same path as mentioned above)
msDFSR-Enabled=FALSE
Stop the DFSR service on all the remaining controllers
#net stop dfsr
Force Active Directory replication throughout the domain and validate its success on all DCs.
#repadmin /syncall /AdP
Start the DFSR service set as authoritative:(On the PDC emulator)
#net start dfsr
You will see Event ID 4114 in the DFSR event log indicating SYSVOL is no longer being replicated.
On the same DN from Step 1, set:
msDFSR-Enabled=TRUE
Run the below command to force Active Directory replication throughout the domain and validate its success on all DCs.
#repadmin /syncall /AdP
Run the following command from an elevated command prompt on the same server that you set as authoritative:(In order to run the below command you need to install the “DFS Management Feature” on the servers , not the DFS Role)
DFSRDIAG POLLAD
You will see Event ID 4602 in the DFSR event log indicating SYSVOL has been initialized. That domain controller has now done a “D4” of SYSVOL.
Start the DFSR service on the other non-authoritative DCs.
#net start dfsr
You will see Event ID 4114 in the DFSR event log indicating SYSVOL is no longer being replicated on each of them.
Revert the the following DN attribute as it was , on all other domain controllers in that domain.
msDFSR-Enabled=TRUE
Run the following command from an elevated command prompt on all non-authoritative DCs (i.e. all but the formerly authoritative one):
DFSRDIAG POLLAD
————————————————————————————-
Voila we could see the replication started working and when we checked the replication status via the command
For /f %i IN (‘dsquery server -o rdn’) do @echo %i && @wmic /node:”%i” /namespace:\\root\microsoftdfs path dfsrreplicatedfolderinfo WHERE replicatedfoldername=’SYSVOL share’ get replicationgroupname,replicatedfoldername,state
(In case if you ran in to an error when running the above command it could be due to the ‘ is get changed to ` when copying and pasting it. Thus change it manually)
OR
dfsrmig /getglobalstate
it shows the status 4 (which is all synced)
I am listing the below articles which helped me in the initial troubleshooting.
http://www.itprotoday.com/windows-8/fixing-broken-sysvol-replication
http://kpytko.pl/active-directory-domain-services/non-authoritative-sysvol-restore-dfs-r
http://kpytko.pl/active-directory-domain-services/authoritative-sysvol-restore-dfs-r/
Good Luck
Muralee
Update 1 (29/01/2018) :
- Added the start and stop DFSR commands.
Windows 2016 License Calculator
Hi
With recent change of Licensing approach by Microsoft to transient from Processor based to Core based license has triggered various confusions for customers. But the HP has come up with a cool calculator that helps to calculate the exact licenses we need to procure per server and the total rights for virtual OSE’s. Further this tool gives an option to add the number of VM’s that we are planning to host and in turn the tool gives the additional license pack we need to order;
http://h17007.www1.hpe.com/us/en/enterprise/servers/licensing/index.aspx#.WT5dwcb-vIU
How to import Users to Windows 2012 Active Directory using PowerShell
Hi Guys
In many AD installations I do come across requirements to create multiple users in Active Directory(More than 200 in many cases) .In these cases we could use the below mentioned CSV template and use the PS command to directly import the users in to Active Directory.
![]()
Here the Path value is pointing to the OU that you want to place the users in the Active Directory , which could be find using the Attribute Editor of the OU(We need to enable the Advance Feature in the ADUC Management Console)
PS Command Syntax
Import-CSV C:\anyname.csv | New-ADUser –AccountPassword (ConvertTo-SecureString –AsPlaintext “any complex password” –Force) –PassThru | Enable-ADAccount.
Example:
Import-CSV C:\Users_1.csv | New-ADUser –AccountPassword (ConvertTo-SecureString –AsPlaintext “P@ssw0rd” –Force) –PassThru | Enable-ADAccount
Update2:
I am including here another method to achieve the same.
# Prepare the CSV file as per below(You could any details as much as you want, by adding the correct attribute.)
firstname,lastname,username,email,department,password,jobtitle,company,ou,Mobile
# Then run the below powershell.
+ You must change the active directory domain name.
+ You must change the csv file name.
+ Ensure that , you have given the proper DN namespace for the OU Value. Otherwise , the script will fail with the below error messages:
“No superior reference has been configured for the directory”
“New-ADUser : The object name has bad syntax”
===================================================================================
# Import active directory module for running AD cmdlets
Import-Module activedirectory
#Store the data from ADUsers.csv in the $ADUsers variable
$ADUsers = Import-csv C:\test.csv
#Loop through each row containing user details in the CSV file
foreach ($User in $ADUsers)
{
#Read user data from each field in each row and assign the data to a variable as below
$Username = $User.username
$Password = $User.password
$Firstname = $User.firstname
$Lastname = $User.lastname
$OU = $User.ou #This field refers to the OU the user account is to be created in
$email = $User.email
$telephone = $User.Mobile
$jobtitle = $User.jobtitle
$company = $User.company
$department = $User.department
$Password = $User.Password
#Check to see if the user already exists in AD
if (Get-ADUser -F {SamAccountName -eq $Username})
{
#If user does exist, give a warning
Write-Warning “A user account with username $Username already exist in Active Directory.”
}
else
{
#User does not exist then proceed to create the new user account
#Account will be created in the OU provided by the $OU variable read from the CSV file
New-ADUser `
-SamAccountName $Username `
-UserPrincipalName “$Username@vands.pro” `
-GivenName $Firstname `
-Surname $Lastname `
-Name “$Firstname $Lastname” `
-DisplayName “$Lastname, $Firstname” `
-Enabled $True `
-Path $OU `
-Company $company `
-EmailAddress $email `
-Mobile $telephone `
-Title $jobtitle `
-Description $jobtitle `
-Department $department `
-AccountPassword (convertto-securestring $Password -AsPlainText -Force) -ChangePasswordAtLogon $True
}
}
===============================================================================
There is no certificates installed on this remote desktop server
On the RD Session Host Configuration when you tried to assign the SSL certificate which you obtained from any vendor you will receive the message in the title.
This is because the SSL certificate need to be imported on .PFX format , In my case the cert i downloaded from GoDaddy was having a .crt extension. Therefore I opened the Certificate-Snapin(Local Computer) and selected the already imported certificate in the Personal container,then I tried to export the certificate as Personal Information Exchange(.pfx)so I could re-import it correctly But I was not able to do so as it was showing the below screen,
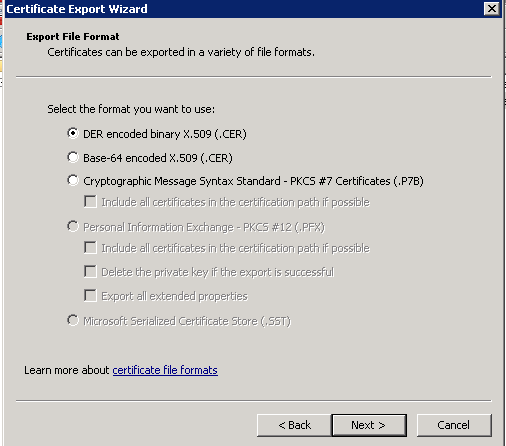
As you see the Personal Information Exchange option is disabled as this is because the SSL certificate does not have the private key.
In order to overcome this get the serial number of the certificate(Open the ssl certificate by double clicking on it and open the details TAB) then on a command prompt entere the below command;
certutil -repairstore my “SerialNumber”
That’s it now you could the export the cert as .pfx and re-import it on Personal and Remote Desktop containers in Certificate Snap-in.
Finally you could select the SSL on RD Session Host configuration.
Source:
http://scexblog.blogspot.com/2010/09/export-personal-information-exchange.html
Update1:
In 2012 and above MS have removed the RDP Snap-in to change the SSL Certificate thus you need to follow the steps mentioned in MS KB Article:https://support.microsoft.com/en-us/help/3042780/remote-desktop-listener-certificate-configurations-in-windows-server-2
Trust relationship cannot be created because the following error occurred
Hi
I was trying to build a Forest wide Trust between 2003 R2 and 2008 R2 environment and I covered the required prerequisites as below;
* The forest functional level should be set to minimum Windows 2003 Server(On the Windows 2003 Domain Controller)
* The conditional forwarding was set up on 2003 and 2008 to resolve target domain names
But still I was getting the error on the title along with the below error ;
“The operation failed: The error is: This operation cannot be performed on the current domain.”
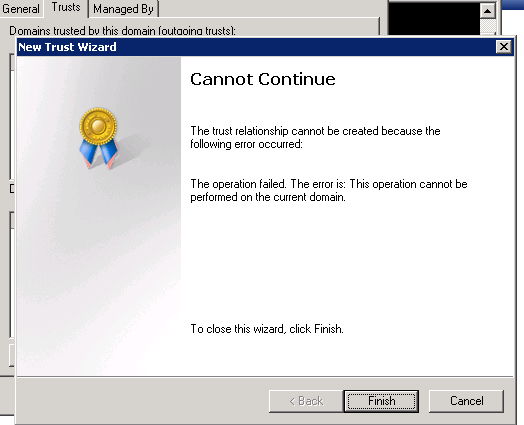
In order to solve this please make sure below identifiers are not same in your both target and source domains
– SID
– NetBIOS name
– DNS name
In my case it was the NetBIOS name and I had to rename the domain name.
Reference
Known Issues for Creating Domain and Forest Trusts
Available From:https://technet.microsoft.com/en-us/library/cc794894%28v=ws.10%29.aspx Accessed (12th May 2015)
How to restore Active Directory Users with Active Directory Recycle bin
Dear Folks
I would strongly recommend to enable this feature to ease up the administration, further If you have deployed Exchange in your environment and if you want to recover a deleted mailbox the AD Recycle bin becomes handy because when you delete the Mailbox on Exchange 2013 it will delete the related AD User Account as well.
In order to restore you could simply restore the AD user account which will restore the Mailbox.
Notes to be remembered
– This setting is irreversible
– A Deleted object stays their for 180 days by default(In case if this does not your business practice please refer http://blogs.technet.com/b/askds/archive/2009/08/27/the-ad-recycle-bin-understanding-implementing-best-practices-and-troubleshooting.aspx)


Once the above is done you could access the ADAC select your domain name then you will find the Deleted Object whereas you could select the user account and select the Restore Option on the Actions pane.
Time Sync Issue on Virtualized Domain Controllers VM on Hyper-V and VMware
Dear Folks
Recently we noticed that our Domain Controller(VM) was throwing the Wrong time and forcing all the other servers and the client pc’s the wrong time.
Hence we started digging the problem by initially finding the source for our Domain Controller Clock it was found out by using the below command
w32tm /query status
Source: VM IC Time Synchronization Provider
This means the source is the Hyper-V Guest Integration Time Service.and in turn our Hyper-V server was having the wrong time.
Therefore what we did is we disabled the “Hyper-V Time Synchronization Service” via services. thereafter we ran the command mentioned above and the source became
Source: Local CMOS Clock
Then we set the local clock on DC to the correct time and noticed that all our servers and client started taking the time from the Domain Controller correctly.
So as a practice I would advice to do the same when your DC is sittings as a VM on any Hypervisor to avoid time sync issues.
Update:1
As per the new recommendation Microsoft is saying to keep the Time Synchronization service enabled and make the below registry entry on the virtualized PDC emulator
reg add HKLM\SYSTEM\CurrentControlSet\Services\W32Time\TimeProviders\VMICTimeProvider /v Enabled /t reg_dword /d 0
and add an external source.
Update:2
On the PDC Emulator role server type the below command to check the communication between the NTP server.
w32tm /stripchart /computer:<target> /samples:<n> /dataonly
Then if it is working fine change the NTP as below;
w32tm /config /manualpeerlist:<peers> /syncfromflags:manual /reliable:yes /update
VMware
As per the VMware recommendation
– Keep the VM Tools Time Synchronization Disabled (By Default)
– Configure the ESXi host to use an external time source(Router / Switch / Public Server)
– Configure the PDC emulator for the external time source same as ESXi Host.
I would like to mention the few commands below which will be useful when dealing NTP issues on Windows;
To Stop/Start NTP
—————–
net stop w32time
net start w32time
To Remove and Install the service
———————————-
w32tm /unregister
w32tm /register
To Configure the PDC to use an external source:
———————————————–
w32tm /config /maunalpeerlist:”fortigate.test.com.sa” /syncfromflags:manual /reliable:yes /update
To Query the status
——————-
w32tm /query /status
w32tm /query /configuration (The output must shows the Type as NTP instead of NTDS5)
To force the time
—————–
w32tm /resync /rediscover
w32tm /config /update
To find the configuration
————————-
w32tm /query /configuration
To check the locaol NTP source
—————————–
w32tm /query /source
To manually check the time source
———————————
w32tm /stripchart /computer:fortigate.test.com.sa /samples:5 /dataonly
To force the member server to sync with the domain controllers available in the domain
w32tm /config /syncfromflags:domhier /update (If the NTP service is disabled make it to manual mode).Inaccessible boot device on Windows 2012 with EMC Networker
Hi
I would like to share my experience related to the above error.
Recently we received a call from our customer saying that 2 VM’s were not booting. We were in panic mode as these 2 servers are the domain controllers and the backup software which was supposed to do the BMR also failing.
Thereafter when we contacted Microsoft Support the team identified the error is due to the “nsrbbwi” key which being added on the Registry by our EMC Networker Backup Tool and once it was removed the servers booted normally.
Go to the below Registry via the Command Prompt from the System Recovery Options
ControlSet001\Control\Class\{533C5B84-EC70-11D2-9505-00C04F79DEAF}
ControlSet001\Control\Class\{71A27CDD-812A-11D0-BEC7-08002BE2092F
Remove the Value for “Upperfilters” as it will be pointed to “nsrbbwi”
Reboot the server.
Source:-
-Microsoft PSS
-https://blogs.technet.com/b/mrmlcgn/archive/2014/02/20/after-installing-upgrading-emc-networker-version-8-1-1-windows-fails-to-boot-stop-error-7b-quot-inaccessible-boot-device-quot.aspx
Best regards
How to migrate the Hyper-V CSV’s to a new Storage
Dear Folks
Recently we sold a VNX 5300 storage to our customer and his intention was to migrate the data from his old EMC AX4 5i Storage.
We proposed him the SAN based migration option but customer was resisting and we have to do it on the Windows level.
The Environment
2 Node Windows 2008 R2 Hyper-V Cluster CSV enabled.
Ax4 5i Storage
EMC Powerpath Free Edition installed on both hosts.
2 FC HBA
Steps Performed.
– Initialized the new storage
– Configured the new LUN’s
– Connected a new HBA’ (Because the server was having only single free PCIE slot)
– Assigned the LUN’s to both the server.
– Logged in to one of the server ( which was the current owner for the CSV)
– Added the LUN as disk via Storage from Failover Cluster Manager)
– Added as CSV (via Cluster Shared Volume from Failover Cluster Manager)
– Exported the Virtual Machine to the new location on the C:\ClusterVolume(Can be any name as per your environment)\NewFolder –>Which will point it to the new disk)
– Deleted the VM from the Hyper-V Manager
– Imported VM again from the new location via the Hyper-V Manager.(Do not change any options from the Import Wizard)
– Finally Changed the Quorrum drive to the new LUN on the Storage via Change Cluster Quorrum Settings from the Failover Cluster Manager)
– Removed the Old Storage
– Fixed the Additional HBA
– Removed EMC Powerpath
– Enabled MPIO
Voila everything went smooth as ice.
Hope this article is useful and incase if you need any additional information please do not hesitate to contact me.
