How to install only Security Updates on CentOS
Hi Folks
These commands are useful when you want to install only the sceurity updates in order to meet any compliance such as PCI
First you need to install the security plugin for the Yum
#yum install yum-security
Once it installed
#yum list-security —–> To check the security updates avaialable
#yum update –security ——> To install only the Securuty Updates.
Good Luck..
How to Tunnel via SSH using Putty
In your daily administration tasks you will come across a need to access the server in the LAN for Eg:- via Remote Desktop ( which are configured with Private IP Addresses) ,Assume that you have a SSH enabled box ( eg:- UTM , SSH Server ,etc) with Public IP Assigned
What you need to do is
* Open Putty Client ( you can download it via http://www.putty.org/)
* enter the IP address of the SSH Enabled box (In my eg:- it is 1.1.1.1)

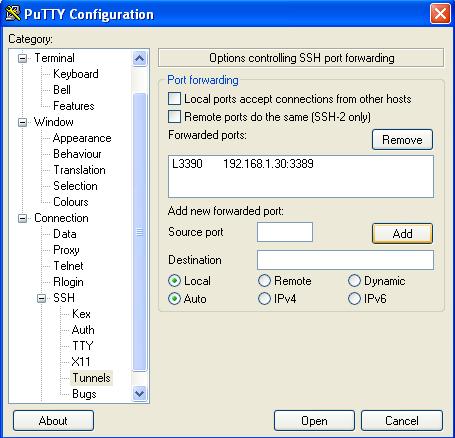
* Clcik on SSH –>Tunnels -> add the details
– Source Port — 3390 some fake port
– Destination — The Private IP of the Server where you want to make the Remote Desktop and the Remote Desktop Port

* Click on Add
* With the above configuration login to the SSH serve with the credentials.
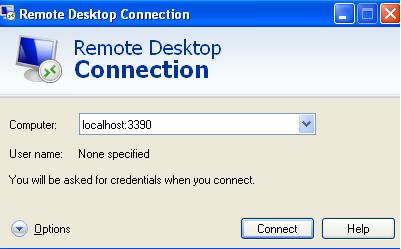
* Finally Open a Remote Desktop Client
NOTE 1 :- The same can be adapted for any ports eg:- FTP , Web , etc
NOTE 2 :- When you want to Remote Desktop using a Windows 7 or later machines do not use the Source port 3390 , For eg:- you could use the 3391
Good Lcuk !
Sub Domain Delegation using Bind
Hi All
When you are administrating the Bind you may come across to host a sub domain delegated to another DNS server from a different provider.These requests are usually from the Web Hosting Provider which helps them to modify the required records on their own using their Name Server.
In this scenario open the zone file in for eg:- test.com and add the following lines ( Adding Sub domain “sample.test.com”)
;Sub Doman delegation for the domain sample.test.com
$ORIGIN sample.test.com.
@ NS ns1.webhost.com. (Other DNS Severs , you could add multiple lines of DNS servers)
NS ns2.webhost.com.
Regards
Exchange Installation Tips
Hi Folks
This for my own reference
Exchange Installation on Non Domain Controller
Exchange Installation on Non Domain Controller
* setup.com /PrepareAD /OrganizationName:”MyOrg”
* setup.com /PrepareLegacy ExchangePermissions –> When Co-existence with 2003
* setup.com /PrepareSchema
* setup.com /PrepareDomain
/PrepareDomain domainname
/PrepareAllDomains
—————————————————————————–
To Check the Exchange 2010 integration with AD –> Check for the Microsoft Exchange Security Group
———————————————————————————-
Exchange 2010 Prerequisties (Refer http://technet.microsoft.com/en-us/library/bb691354(EXCHG.140).aspx#WS08R2)
* Office Filter PAck – HT . MBOX
* Import-MOdule ServerManager
For CAS, HT , MBOX
——————-
Add-WindowsFeature NET-Framework,RSAT-ADDS,Web-Server,Web-Basic-Auth,Web-Windows-Auth,Web-Metabase,Web-Net-Ext,Web-Lgcy-Mgmt-Console,WAS-Process-Model,RSAT-Web-Server,Web-ISAPI-Ext,Web-Digest-Auth,Web-Dyn-Compression,NET-HTTP-Activation,RPC-Over-HTTP-Proxy -Restart
For CAS,HT,MBOX,UM
——————
Add-WindowsFeature NET-Framework,RSAT-ADDS,Web-Server,Web-Basic-Auth,Web-Windows-Auth,Web-Metabase,Web-Net-Ext,Web-Lgcy-Mgmt-Console,WAS-Process-Model,RSAT-Web-Server,Web-ISAPI-Ext,Web-Digest-Auth,Web-Dyn-Compression,NET-HTTP-Activation,RPC-Over-HTTP-Proxy,Desktop-Experience -Restart
For CAS &HT
————
Add-WindowsFeature NET-Framework,RSAT-ADDS,Web-Server,Web-Basic-Auth,Web-Windows-Auth,Web-Metabase,Web-Net-Ext,Web-Lgcy-Mgmt-Console,WAS-Process-Model,RSAT-Web-Server,Web-ISAPI-Ext,Web-Digest-Auth,Web-Dyn-Compression,NET-HTTP-Activation,RPC-Over-HTTP-Proxy -Restart
For HT & MBOX
————-
Add-WindowsFeature NET-Framework,RSAT-ADDS,Web-Server,Web-Basic-Auth,Web-Windows-Auth,Web-Metabase,Web-Net-Ext,Web-Lgcy-Mgmt-Console,WAS-Process-Model,RSAT-Web-Server -Restart
For CAS & MBOX
—————
Add-WindowsFeature NET-Framework,RSAT-ADDS,Web-Server,Web-Basic-Auth,Web-Windows-Auth,Web-Metabase,Web-Net-Ext,Web-Lgcy-Mgmt-Console,WAS-Process-Model,RSAT-Web-Server,Web-ISAPI-Ext,Web-Digest-Auth,Web-Dyn-Compression,NET-HTTP-Activation,RPC-Over-HTTP-Proxy -Restart
For CAS Only
————–
Add-WindowsFeature NET-Framework,RSAT-ADDS,Web-Server,Web-Basic-Auth,Web-Windows-Auth,Web-Metabase,Web-Net-Ext,Web-Lgcy-Mgmt-Console,WAS-Process-Model,RSAT-Web-Server,Web-ISAPI-Ext,Web-Digest-Auth,Web-Dyn-Compression,NET-HTTP-Activation,RPC-Over-HTTP-Proxy -Restart
For HT OR MBOX
—————–
Add-WindowsFeature NET-Framework,RSAT-ADDS,Web-Server,Web-Basic-Auth,Web-Windows-Auth,Web-Metabase,Web-Net-Ext,Web-Lgcy-Mgmt-Console,WAS-Process-Model,RSAT-Web-Server -Restart
For UM Only
—————-
Add-WindowsFeature NET-Framework,RSAT-ADDS,Web-Server,Web-Basic-Auth,Web-Windows-Auth,Web-Metabase,Web-Net-Ext,Web-Lgcy-Mgmt-Console,WAS-Process-Model,RSAT-Web-Server,Desktop-Experience -Restart
For Edge Only
—————-
Add-WindowsFeature NET-Framework,RSAT-ADDS,ADLDS -Restart
Only for CAS Set-Service NetTcpPortSharing -StartupType Automatic
———————————————————————————-
Removing CAS Roles
————————————————————————————
[PS] C:\>$vd = Get-OwaVirtualDirectory -Server lab-casex27-01
[PS] C:\>foreach ($objitem in $vd){ Remove-OwaVirtualDirectory $objitem}
Confirm
Are you sure you want to perform this action?
The Remove-OwaVirtualDirectory cmdlet is removing Outlook Web Access virtual
directory “LAB-CASEX27-01\owa (Default Web Site)”.
[Y] Yes [A] Yes to All [N] No [L] No to All [S] Suspend [?] Help
(default is “Y”):
setup /mode:uninstall /role:ca
——————————————————————————————-
Getting Information on Existing Setup
——————————————————————————————-
Get-ClientAccessArray
Get-DatabaseAvailabilityGroup
Get-MailboxDatabase -Server “servername” | fl name,rpc ==> To identify that DB’s are assigned with relevant RPC
Get-ExchangeServer
Creating the CAS Array
————————–
New-ClientAccessArray -Name exchange -Site “Default-First-Site-Name” -Fqdn exchange.integratednetworks.net
Adding the CAS Array to the Mailbox
—————————————————————————–
Get-MailboxDatabase | Set-MailboxDatabase -RPCClientAccessServer “Client.msglab.local”
DAG Configuration
———————————————————————————
New-DatabaseAvailabilityGroup -Name DAG -WitnessServer HV01 -WitnessDirectory “c:\witness” -DatabaseAvailabilityGroupIPAddresses 192.168.1.6 –Verbose
Add-DatabaseAvailabilityGroupServer -Identity DAG -MailboxServer MB0X1 -Verbose
Add-DatabaseAvailabilityGroupServer -Identity DAG -MailboxServer MB0X2 -Verbose
—- Add-MailboxDatabaseCopy -Identity MB01 -MailboxServer EX10-MB02
Set-DatabaseAvailabilityGroup -Identity DAG1 -AlternateWitnessDirectory C:\DAGFileShareWitnesses\DAG1.contoso.com -AlternateWitnessServer CAS3
Setting the DAG Network
—————————
Set-DatabaseAvailabilityGroupNetwork -Identity “\MAPI Network” -ReplicationEnabled:$false
Set-DatabaseAvailabilityGroupNetwork -Identity “\Storage Network” -ReplicationEnabled:$false -IgnoreNetwork:$true
Set-databaseavailabilitygroup DAG –witnessserver HV01 -witnessdirectory c:\witness
To Failback
————————–
RedistributeActiveDatabases.ps1 –DagName DAG1 –BalanceDBsByActivationPreference –Confirm:$false
Test-ReplicationHealth
For OWA Blank Page Error
———————————————————–
Open the updatecas.Ps1 with Powershell
For Addressbook,Public Folders Migration from Exchange 2003 to 2010
——————————————————————-
Get-EmailAddressPolicy | where {$_.RecipientFilterType –eq “Legacy”} |
Set-EmailAddressPolicy –IncludedRecipients AllRecipients
Set-AddressList “All Users” –IncludedRecipients MailboxUsers
Set-AddressList “All Groups” –IncludedRecipients Mailgroups
Set-AddressList “All Contacts” –IncludedRecipients MailContacts
Set-AddressList “Public Folders” –RecipientFilter {RecipientType –eq “PublicFolder”}
Set-GlobalAddressList “Default Global Address List” -RecipientFilter {(Alias -ne $null -and (ObjectClass -eq ‘user’ -or ObjectClass -eq ‘contact’
-or ObjectClass -eq ‘msExchSystemMailbox’ -or ObjectClass
-eq ‘msExchDynamicDistributionList’ -or ObjectClass -eq ‘group’
-or ObjectClass -eq ‘publicFolder’))}
To enable Antispam on Exchange 2010
————————————-
-.\install-AntispamAgents.ps1
– Restart-Service MSExchangeTransport
– Set-TransportConfig -InternalSMTPServers x.x.x.x,y.y.y.y ( Enter all the SMTP servers)
——————————————————————————————–
Exchange 2013
** Before Installing Exchange 2013 you must prepare the Active Directory , and the mahine used to preapre
the AD should have
Microsoft .NET Framework 4.5
Windows Management Framework 3.0 (.NET Framework 4.5 and Windows Management Framework 3.0 are included with Windows Server 2012 and don’t need to be installed separately. )
# Install-WindowsFeature RSAT-ADDS
Then prepare the Active Directory ( SUbstitute with /IAcceptExchangeServerLicenseTerms)
# setup /PrepareSchema
# setup /PrepareAD [/OrganizationName:]
# setup /PrepareDomain
Then Mailbox and Client Access Role together
———————————————-
Install-WindowsFeature AS-HTTP-Activation, Desktop-Experience, NET-Framework-45-Features, RPC-over-HTTP-proxy, RSAT-Clustering, RSAT-Clustering-CmdInterface, Web-Mgmt-Console, WAS-Process-Model, Web-Asp-Net45, Web-Basic-Auth, Web-Client-Auth, Web-Digest-Auth, Web-Dir-Browsing, Web-Dyn-Compression, Web-Http-Errors, Web-Http-Logging, Web-Http-Redirect, Web-Http-Tracing, Web-ISAPI-Ext, Web-ISAPI-Filter, Web-Lgcy-Mgmt-Console, Web-Metabase, Web-Mgmt-Console, Web-Mgmt-Service, Web-Net-Ext45, Web-Request-Monitor, Web-Server, Web-Stat-Compression, Web-Static-Content, Web-Windows-Auth, Web-WMI, Windows-Identity-Foundation
Thereafter install the below
1.Microsoft Unified Communications Managed API 4.0, Core Runtime 64-bit
2.Microsoft Office 2010 Filter Pack 64 bit
3.Microsoft Office 2010 Filter Pack SP1 64 bit
Installing only the Client Access role
———————————————-
Install-WindowsFeature AS-HTTP-Activation, Desktop-Experience, NET-Framework-45-Features, RPC-over-HTTP-proxy, RSAT-Clustering, Web-Mgmt-Console, WAS-Process-Model, Web-Asp-Net45, Web-Basic-Auth, Web-Client-Auth, Web-Digest-Auth, Web-Dir-Browsing, Web-Dyn-Compression, Web-Http-Errors, Web-Http-Logging, Web-Http-Redirect, Web-Http-Tracing, Web-ISAPI-Ext, Web-ISAPI-Filter, Web-Lgcy-Mgmt-Console, Web-Metabase, Web-Mgmt-Console, Web-Mgmt-Service, Web-Net-Ext45, Web-Request-Monitor, Web-Server, Web-Stat-Compression, Web-Static-Content, Web-Windows-Auth, Web-WMI, Windows-Identity-Foundation
Thereafter install the below
—————————–
•Microsoft Unified Communications Managed API 4.0, Core Runtime 64-bit
How to access the Management Console
————————————–
High Availability
http://technet.microsoft.com/library/dd638129%28EXCHG.150%29
Chaning the Exhange Database Names and Paths
———————————————-
Move-Databasepath “DatabaseName” –EdbFilepath “C:\Newlocation\DBname.edb” –LogFolderpath “C:\Newlocation”
Only moving the logpath
————————-
Move-Databasepath -identity “DatabaseName” –LogFolderpath “C:\Newlocation”
Move-Databasepath “DatabaseName” –EdbFilepath “C:\Newlocation\DBname.edb” –LogFolderpath “C:\Newlocation”
Creating Client Acces Array
——————————–
http://exchangeserverpro.com/exchange-2013-client-access-server-high-availability/
HTTP Error 500.22 – Internal Server Error An ASP.NET setting has been detected that does not apply in Integrated managed pipeline mode.
Hi Folks
When you are configuring a web site you may face the above error ,and it caused by a wrong pipeline mode which you can change it with the below steps
Source:- forums.iis.net
* Open IIS Manager
* Go to the Application Pools
* Select the required Application Pool -> Change the Manage Pipeline Mode to Classic as below

Once it done -> Right Click on the Application Pool –> Click Recycle.
Good Luck.
How to create a LUN to be shared by two hosts – EMC VNX 5100
Hi
In some scenarios you amy need to create a LUN which need to be accessed by two hosts( For Cluster ,etc)
keep in mind if there is no cluster aware applications you may damage the data on the shared LUN.
So the easied way to do this is
Create 2 Storage Groups as below
Stoarge Group 1 – Server 1 , LUN A
Storage Group 2 – Server 2 , LUN A
Even though I made this on EMC VNX 5100 the same thing is applicable on all the other storage devices
thanks.
How to force the DNS Propogation by changing the TTL Values
Hi
I am writing this tip for DNS Administrators who wants to speed up porpogation changes by playing with TTL (Time to live) values For Eg:-
Assuming that you are changing the IP Address of http://www.test.com by default the Bind (Linux based DNS Server) the TTL Value is set for 7200 which is 2 hours as a global parameter.which will control the expiry time / refressh interval for your DNS records in other DNS servers cache .
Therefore if you want to change the TTL value only for the http://www.test.com as 5 minutes you could edit the ZONE file as follows
$ORIGIN test.com
www 300 A 1.1.1.1(Replace it with your Actual IP Address)
(here 300 denotes 5 Minutes )and restart the named services.
Same concept is applicable for the Windows based DNS Servers as well//
Cool Tool- SYDI
I recently tested this cool opensource tool which can be used for documenting you entire LAN called SYDI
Less complicated single command to gather vast amount of details
Including Windows & Linux based servers
Check out the cool tool
URL : – http://sydiproject.com/
Error – Login failed the user is not associated with the trusted SQL server coonection.
Hi friends
Those who try to login to SQL Management Studio with the SQL based authentication would be receiving the below error

If you have disabled the SQL authentication on your SQL server you would be receiving this error.
Workaround — It is easy
– Open the Management Studio
– Right Click on the Server Name – -> properties –> Click on Security and Change the
authentication as follows

How to idenitfy a process ID using the TCP Port
Recently i had an issue in one of my linux machines, where I was unable to start the acronis_agent service which listens on TCP Port ;
Later I realised that already so many processes are listening on the TCP port.
To check the open connection for a TCP port
# netstat -an | grep 9876 ( In my case acronis_agent uses TCP 9876)
It was showing multiple connections………….
To check the PID(Process ID ) for all the sessions which are using the port 9876
#lsof -i TCP:9876
finally you could use the almighty command “kill -9 PID” …. boom everything became normal.
