The storage processor in the targeted storage system have inconsistent settings.
Dear Folks
When you are initializing a VNX storage via Storage Initialization Tool you may face the below error whereas you will not be able to set an IP addresses for the storage processors.


In order to solve this you must connect SPA and SPB management ports to the Ethernet Switch and begin the initialization process.
If the above step did not solve your issue ,there was another recommendation from the EMC forums advising that to use a CAT 6 cable and make the NIC setting for duplex as AUTO.
Good Luck.
Cannot retreive metalink for repository epel
Hi
If some body receive the above error first you should check the connectivity and firewall issues and still if the problem persist.
Sample Error
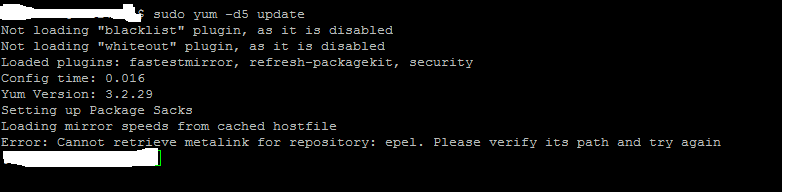 You should edit the /etc/yum/repos.d/CentOS-base.repo or epel.repo
and change all the URL’s that pointing to https to http save the file
Restart the yum process.
Hint – Always start the yum process with debug switch ,which helps us in troubleshooting – ( yum -d6 update)
CentOS yum error 14: PCYURL ERROR 7 – “Failed to connect to 2a02:2498:1:3d:5054:ff:fed3:e9
Dear Folks
When you are trying to update the system with yum , you may come with the above error , In which the yum tool is trying to resolve the mirrorlist url’s via IPv6 Address.
 What happens here is that when the yum is unable to resolve and reach the IPv4 address it end up trying the IPv6.
Hence if you face the similar issue , I would advice you to go through the below steps and identify the real cause.
Step 1 – Check whether you could resolve the URL (mirrorlist.centos.org) via nslookup or dig and get an IPV6 address.
If you fail at the above step check for the DNS configurations in /etc/resolv.conf
Step 2 – Check with the firewall team that they have allowed the ports 80 , 443 ,21 from the linux server.
In my case it was the firewall blockage.
I have been googling regarding the same issue and found out that several articles pointing to IPV6 saying that to disable it. Hence you could try that as a last resort , if the above steps did not succeed.
– edit the /etc/sysconfig/network and the /etc/sysconfig/network-scripts/ifcfg-eth* files to disable any entries pointing to IPv6
– edit /etc/sysctl.conf and put the below entries and reboot the server
net.ipv6.conf.all.disable_ipv6 = 1
net.ipv6.conf.default.disable_ipv6 =
– disable the ip6tables.
Good Luck
How to move the database and transaction log files on Exchange 2010 DAG servers
Hi Folks
In case if you want move the transaction logs and the exchange database to a new location on the disk , you have to follow certain guidelines to avoid exchange nightmare.
But I would like to recommend you do this before you establish the DAG ,
In-case if you have forgotten to do this before establishing the DAG you should do the below steps on the exchange servers that are part of the DAG in the mentioned order
– Disable the Circular logging ( In-case if it was enabled before)
– Then you need to remove the database copies on each database per each each server
Remove-MailboxDatabaseCopy -Identity DB1\MBX1 -Confirm:$False (This Eg:- will remove the copy of the database DB1 on the MBX1 server)
– Create the necessary folder on the new location
– Move the Mailbox databases as below
* Open Exchange Management Console
* Navigate to Organization Configuration -> Mailbox -> Database Management -> Select the Mailbox Database
* Right click on it select “Move Database Path” and enter the new locations
– On each DAG member server you will find the passive copy of the database for the other member servers,normally stored on the original location where the Active Mailbox is
stored ,You need to move these files to the new location , Keep in mind when you are moving the Passive Copies of the database it should be stored on the same drive letter where
the Active Mailbox database is stored on the active member.
Eg:- Server1 host the mailbox DB1 on C:\DB Folder , hence you need to maintain the same drive letter on the remote server(Server2) where it will host the passive copy for the DB1
Do the same on all the DAG members
– Now add the Mailbox database copies for all the servers.
Add-MailboxDatabaseCopy -Identity DB1 -MailboxServer Server2 -ActivationPreference 2
– On each server where the mailbox was moved run the below commands Net stop msftesql-Exchange Net start MSExchangeSearch
Tip:- I came across an issue where when I changed the drive letter on the server where it holds the mailbox , the database dismounted,therefore if you face the same issue use the
Move-Database command with the -ConfigurationOnly Parameter.
How to identify the Exchange server Service Pack Levels
Hi
Use the below table to identify the Exchange Server versions and their service pack level.
Source :- Technet
| Product name | Build number | Date |
| Microsoft Exchange Server 2003 | 6.5.6944233 | 3 |
| Microsoft Exchange Server 2003 SP1 | 6.5.7226 | 5/25/2004 |
| Microsoft Exchange Server 2003 SP2 | 6.5.7638 | 10/19/2005 |
| Microsoft Exchange Server 2007 | 8.0.685.24 | 12/9/2006 |
| Microsoft Exchange Server 2007 | 8.0.685.25 | 12/9/2006 |
| Microsoft Exchange Server 2007 SP1 | 8.1.240.6 | 11/29/2007 |
| Microsoft Exchange Server 2007 SP2 | 8.2.176.2 | 8/24/2009 |
| Microsoft Exchange Server 2007 SP3 | 8.3.083.6 | 6/20/2010 |
| Microsoft Exchange Server 2010 | 14.0.639.21 | 11/9/2009 |
| Microsoft Exchange Server 2010 SP1 | 14.1.218.15 | 8/24/2010 |
| Microsoft Exchange Server 2010 SP2 | 14.2.247.5 | 12/4/2011 |
| Microsoft Exchange Server 2010 SP3 | 14.3.123.4 | 2/12/2013 |
| Microsoft Exchange Server 2013 | 15.0.516.32 | 10/11/2012 |
Exchange Server 2007 Service Pack1
| Product name | Build number | Date | KB | |
| Microsoft Exchange Server Exchange 2007 SP1 | 8.1.240.6 | 11/29/2007 | ||
| Update Rollup 1 for Exchange Server 2007 Service Pack 1 | 8.1.263.1 | 2/28/2008 |
|
|
| Update Rollup 2 for Exchange Server 2007 Service Pack 1 | 8.1.278.2 | 5/8/2008 |
|
|
| Update Rollup 3 for Exchange Server 2007 Service Pack 1 | 8.1.291.2 | 7/8/2008 |
|
|
| Update Rollup 4 for Exchange Server 2007 Service Pack 1 | 8.1.311.3 | 10/7/2008 |
|
|
| Update Rollup 5 for Exchange Server 2007 Service Pack 1 | 8.1.336.1 | 11/20/2008 | ||
| KB953467 | ||||
| Update Rollup 6 for Exchange Server 2007 Service Pack 1 | 8.1.340.1 | 2/10/2009 |
|
|
| Update Rollup 7 for Exchange Server 2007 Service Pack 1 | 8.1.359.2 | 3/18/2009 |
|
|
| Update Rollup 8 for Exchange Server 2007 Service Pack 1 | 8.1.375.2 | 5/19/2009 |
|
|
| Update Rollup 9 for Exchange Server 2007 Service Pack 1 | 8.1.393.1 | 7/17/2009 |
|
|
| Update Rollup 10 for Exchange Server 2007 Service Pack 1 | 8.1.436.0 | 4/9/2010 |
|
Exchange Server Service Pack 2
| Product name | Build number | Date | KB | |
| Microsoft Exchange Server 2007 SP2 | 8.2.176.2 | 8/24/2009 | ||
| Update Rollup 1 for Exchange Server 2007 Service Pack 2 | 8.2.217.3 | 11/19/2009 |
|
|
| Update Rollup 2 for Exchange Server 2007 Service Pack 2 | 8.2.234.1 | 1/22/2010 |
|
|
| Update Rollup 3 for Exchange Server 2007 Service Pack 2 | 8.2.247.2 | 3/17/2010 |
|
|
| Update Rollup 4 for Exchange Server 2007 Service Pack 2 | 8.2.254.0 | 4/9/2010 |
|
|
| Update Rollup 5 for Exchange Server 2007 Service Pack 2 | 8.2.305.3 | 12/7/2010 |
|
Exchange Server Service Pack 3
| Product name | Build number | Date | KB | |
| Microsoft Exchange Server 2007 SP3 | 8.3.083.6 | 6/20/2010 | ||
| Update Rollup 1 for Exchange Server 2007 Service Pack 3 | 8.3.106.2 | 9/9/2010 |
|
|
| Update Rollup 2 for Exchange Server 2007 Service Pack 3 | 8.3.137.3 | 12/10/2010 |
|
|
| Update Rollup 3 for Exchange Server 2007 Service Pack 3 | 8.3.159.0 | 3/2/2011 |
|
|
| Update Rollup 3-v2 for Exchange Server 2007 Service Pack 3 | 8.3.159.2 | 3/30/2011 |
|
|
| Update Rollup 4 for Exchange Server 2007 Service Pack 3 | 8.3.192.1 | 7/7/2011 |
|
|
| Update Rollup 5 for Exchange Server 2007 Service Pack 3 | 8.3.213.1 | 9/21/2011 |
|
|
| Update Rollup 6 for Exchange Server 2007 Service Pack 3 | 8.3.245.2 | 1/25/2012 |
|
|
| Update Rollup 7 for Exchange Server 2007 Service Pack 3 | 8.3.264.0 | 4/16/2012 |
|
|
| Update Rollup 8 for Exchange Server 2007 Service Pack 3 | 8.3.279.3 | 8/13/2012 |
|
|
| Update Rollup 8-v2 for Exchange Server 2007 Service Pack 3 | 8.3.279.5 | 10/9/2012 |
|
|
| Update Rollup 8-v3 for Exchange Server 2007 Service Pack 3 | 8.3.279.6 | 11/13/2012 |
|
|
| Update Rollup 9 for Exchange Server 2007 Service Pack 3 | 8.3.297.2 | 12/10/2012 |
|
|
| Update Rollup 10 for Exchange Server 2007 Service Pack 3 | 8.3.298.3 | 2/11/2013 |
|
|
| Update Rollup 11 for Exchange Server 2007 Service Pack 3 | 8.3.327.1 | 8/13/2013 |
|
Exchange Server 2010
| Product name | Build number | Date | KB | |
| Microsoft Exchange Server 2010 RTM | 14.0.639.21 | 11/9/2009 | ||
| Update Rollup 1 for Exchange Server 2010 | 14.0.682.1 | 12/9/2009 |
|
|
| Update Rollup 2 for Exchange Server 2010 | 14.0.689.0 | 3/4/2010 |
|
|
| Update Rollup 3 for Exchange Server 2010 | 14.0.694.0 | 4/9/2010 |
|
|
| Update Rollup 4 for Exchange Server 2010 | 14.0.702.1 | 6/17/2010 |
|
|
| Update Rollup 5 for Exchange Server 2010 | 14.0.726.0 | 12/13/2010 |
|
Exchange Server 2010 Service Pack 1
| Product name | Build number | Date | KB | |
| Microsoft Exchange Server 2010 SP1 | 14.1.218.15 | 8/24/2010 | ||
| Update Rollup 1 for Exchange Server 2010 SP1 | 14.1.255.2 | 10/4/2010 |
|
|
| Update Rollup 2 for Exchange Server 2010 SP1 | 14.1.270.1 | 12/9/2010 |
|
|
| 14.1.289.3 | 3/7/2011 |
|
||
| Update Rollup 3 for Exchange Server 2010 SP1 | ||||
| Update Rollup 3-v3 for Exchange Server 2010 SP1 | 14.1.289.7 | 4/1/2011 |
|
|
| Update Rollup 4 for Exchange Server 2010 SP1 | 14.1.323.1 | 6/22/2011 |
|
|
| Update Rollup 4-v2 for Exchange Server 2010 SP1 | 14.1.323.6 | 7/27/2011 |
|
|
| Update Rollup 5 for Exchange Server 2010 SP1 | 14.1.339.1 | 8/23/2011 |
|
|
| Update Rollup 6 for Exchange Server 2010 SP1 | 14.1.355.2 | 10/27/2011 |
|
|
| Update Rollup 7 for Exchange Server 2010 SP1 | 14.1.421.0 | 8/13/2012 |
|
|
| Update Rollup 7-v2 for Exchange Server 2010 SP1 | 14.1.421.2 | 10/9/2012 |
|
|
| Update Rollup 7-v3 for Exchange Server 2010 SP1 | 14.1.421.3 | 11/12/2012 |
|
|
| Update Rollup 8 for Exchange Server 2010 SP1 | 14.1.438.0 | 12/10/2012 |
|
Exchange Server Service Pack 2
| Product name | Build number | Date | KB | |
| Microsoft Exchange Server 2010 SP2 | 14.2.247.5 | 12/4/2011 | ||
| Update Rollup 1 for Exchange Server 2010 SP2 | 14.2.283.3 | 2/13/2012 |
|
|
| Update Rollup 2 for Exchange Server 2010 SP2 | 14.2.298.4 | 4/16/2012 |
|
|
| Update Rollup 3 for Exchange Server 2010 SP2 | 14.2.309.2 | 5/29/2012 |
|
|
| Update Rollup 4 for Exchange Server 2010 SP2 | 14.2.318.2 | 8/13/2012 |
|
|
| Update Rollup 4-v2 for Exchange Server 2010 SP2 | 14.2.318.4 | 10/9/2012 |
|
|
| Update Rollup 5 for Exchange Server 2010 SP2 | 14.2.328.5 | 11/13/2012 | KB2719800 | |
| Update Rollup 5-v2 for Exchange Server 2010 SP2 | 14.2.328.10 | 12/10/2012 |
|
|
| Update Rollup 6 for Exchange Server 2010 SP2 | 14.2.342.3 | 2/11/2013 |
|
|
| Update Rollup 7 for Exchange Server 2010 SP2 | 14.2.375.0 | 8/13/2013 |
|
Exchange Server 2010 Service Pack 3
| Product name | Build number | Date | KB | |
| Microsoft Exchange Server 2010 SP3 | 14.3.123.4 | 2/12/2013 |
|
|
| Update Rollup 1 for Exchange Server 2010 SP3 | 14.3.146.0 | 5/29/2013 |
|
|
| Update Rollup 2 for Exchange Server 2010 SP3 | 14.3.158.1 | 8/13/2013 |
|
Exchange Server 2013
| Product name | Build number | Date | KB | |
| Microsoft Exchange Server 2013 Preview | 15.0.466.13 | 7/16/2012 | ||
| Microsoft Exchange Server 2013 RTM | 15.0.516.32 | 10/11/2012 | ||
| Exchange Server 2013 Cumulative Update 1 (CU1) | 15.0.620.29 | 4/2/2013 |
|
|
| Exchange Server 2013 Cumulative Update 2 (CU2) | 15.0.712.22 | 7/9/2013 | KB2859928 | |
| Exchange Server 2013 Cumulative Update 2 (CU2-v2) | 15.0.712.24 | 7/29/2013 |
|
|
| Exchange Server 2013 Cumulative Update 3 |
How to delete the Exchange Server transaction logs
Dear Folks
When your are performing a backup which is not Exchange Aware or for some reason the job fails , you will fall in to situation where the exchange transaction logs will not be cleared automatically and end up in eating your disk space.
I have listed the steps where you could identify the logs that have been committed already and delete them manually.
– Open Powershell
– Browse it to the exchange installation directory (x:\Program Files\Microsoft\Exchange Server\V14\bin\)
– Then run the command “eseutil /mk “C:\MDBDATA\MDB01\E00.chk”
Output of the above command will be similar to – Checkpoint: (0x4B1D,FFFF,FFFF)
– Remember the value “0x4B1D”
Go to the Exchange Transactions log folder and arrange the files on the “Modified Time”
– Then look in to the folder for the file with the value “0x4B1D” and delete the files above them.
NOTE:- Since the log files are deleted immediately you must take a full backup for the safety of the exchange environment.
How to Disable IPV6 on Windows
Dear Folks
Some of us will encounter the below error message on a DNS server installed on Windows 2008 / 2012

But this is not a real problem ,and there will be no technical glitches based on this also Microsoft do not recommend disabling the IPV6 on Windows and Exchange servers.
Still if you want to hide this error you could do either of the below option
Option 1
1.identify the name of the LAN connection using ipconfig(in my LAB the name of the connection is “Local Area Connection”
2. netsh interface ipv6 delete dnsserver “Local Area Connection” ::1
Option2
1.netsh interface ipv6 show interfaces
2.netsh interface ipv6 delete dnsserver name=”IDX#” address=::1
NOTE:- Keep reading on IPV6 and Microsoft guidelines and discussion since these are getting updated frequently
Good Luck..
Active Directory Domain Servers could not transfer the remainig data in directory partiiton
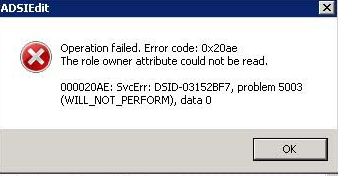
Hi
Recently I faced an issue with one of our clients where he was unable to run the DCPromo to demote the server , he was getting the below error.
The server operating system was Windows 2008 R2.

After some research I found out that the reason is that the fsMORoleOwner attribute was pointing to an incorrect entry ,it may contain an entry such as “0ADEL:123456f8-1238-1233-1230-123456361b8b” But the actual FSMO role owner is dc1.test.local.
I was trying to change the attribute via ADSI Edit on the server which I need to demote , But again I was faced with the below error.
So if anybody faces a similar incident , they should do the below steps. by log in to the current domain controller which was holding the schema master role
* Identify the current FSMO Role Owner by
netdom /query fsmo
1 Login to the current owner , and open the ADSI Edit
2 Connect to the DC=ForestDnsZones,DC=test,DC=lab
3 Right click on CN=Infrastructure go to Properties
4 On CN=Infrastructure Properties click on fsMORoleOwner attribute and click on edit you will find an incorrect entry as below 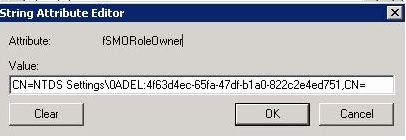
5 Clear the text and enter the below text.
CN=NTDS Settings,CN=dc,CN=Servers,CN=HeadOffice,CN=Sites,CN=Configuration,DC=test,DC=local.
After the above steps repeat the step2 to connect it to the DC=DomainDnsZones,DC=test,DC=lab and repeat the steps 3,4 & 5
Voila Press OK and close the ADSI Edit and now login to the server where you want to demote and run the DCPromo command and now you will be able to complete the wizard without any error
“I would like to thank “Antonie Khater” for his blog entry which was really helping me to focus in to the right direction”
Error code: 0x800F0906 while installing Microsoft .NET Framework 3.5
Hi Friends
Those who try to install .NET Framework through “Windows Feature” on Windows 8 or 2012 may receive the above mentioned error.
The quickest workaround for this issue ,
– Insert the Windows 8 or Windows 2012 Media
– Type the below command on the elevated Command Prompt.
Dism /online /enable-feature /featurename:NetFx3 /All /Source:<drive>:\sources\sxs /LimitAccess ( Replace the <drive> with your DVD Drive letter
Source:TechNet
Good Luck…
How to reinstall the failed Additional Domain Controller on Windows 2012
Hi Folks
Recently I faced an issue with a customer where we have installed a Windows 2012 Additional Domain Controller as a Virtual Machine on Hyper-v Server , he was getting the below error.

So I was trying with all the CHKDSK , Last Known Good Configuration , Directory Restore mode BUT everything failed, Including the below suggestion on Technet forums
Since I had to meet the SLA on solving the ticket , I decided to re-install the Additional Domain Controller on the same name ,which will avoid me of Cleaning the metadata and other complex task.
So I performed the follow steps.
- Re-installed the Windows 2012 Guest on Hyper-V
- Change the name to my previous Additional Domain Controller name.
- Open the Powershell
- Add-WindowsFeature AD-Domain-Services –> This will install the Active Directory Domain Services.
- Import-Module ADDSDeployment
- Install-ADDSDomainController -AllowDomainControllerReinstall -Credential (Get-Credential) -DomainName “test.local”This will prompt you to enter the credential , make sure you enter the credential either in DOMAINNAME\Administrator OR Administrator@DOMAINNAME
Secondly it will prompt you to enter the Directory Restore Password - That’s all it will promote the new server as a domain controller , you do not need to do anything on DNS or other related services.
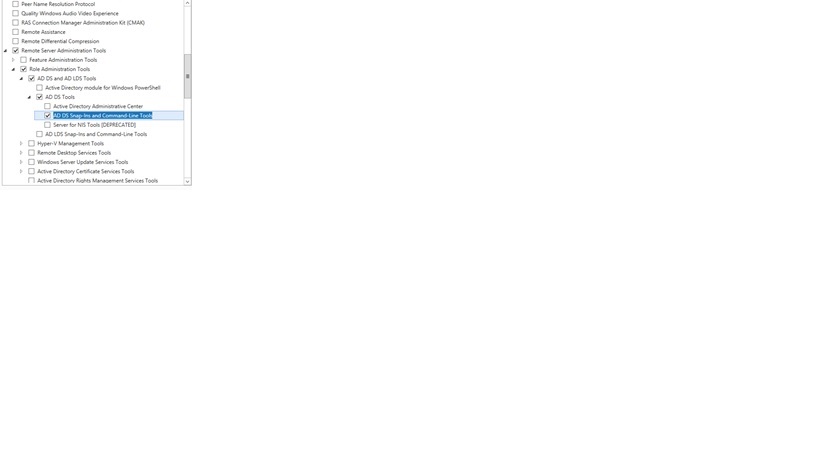
- Finally you will need to install the ADDS Management Tools to Manage the Active Directory components you could do it via PowershellImport-Module ServerManager
Add-WindowsFeature RSAT-AD-PowerShell,RSAT-AD-Tools and hit enter
OR via the GUI
Voila… My problem was solved . Good luck Guys….
