Posts filed under ‘Exchange and O365’
Exchange 2010 Transport Service starts and stops automatically
Dears
Recently I had a problem in one of my customer sites where they have Exchange 2010 servers running on Windows 2008. The initial call I received is that the Inbound email has stopped. When I checked on the server the C:\ free space was less than 4 GB . After some googling I found out that it could be due to Exchange 2010 Back pressure and disabled the Resource Monitoring as below;
- Stopped Exchange Transport Services.
- Open the EdgeTransport.exe.config in the bin folder in Exchange Installation directory
- Edited the parameter <add key=”EnableResourceMonitoring” value=”true” /> to be as false
- Restarted the Transport services
The Mail flow started again , but unfortunately I received the call again saying that the Transport service has stopped , when I tried to start it manually it stops again. After few hours of troubleshooting we decided to contact MS Professional support as we want to bring up the environment as soon as possible. The MS Team went through several process and finally decided to patch the server with the latest Exchange 2010 Rollup 15 , Voila the services was restored.
I shared this , because there are few good articles with regard to MS Exchange Back pressure and MTA service but none of them was related to my experience so it will help somebody who have the same issue.
GoodLuck
Cross Forest Migration from Exchange 2003 to Exchange 2016 using CodeTwo
Hi All
After a long pause I thought add a new post about a recent project that I worked with .The project was to perform a cross forest migration from Exchange 2003 to Exchange 2016 .We had to bypass the double hop migration ,thus we chose CodeTwo exchange migration to move directly from Exchange 2003 to Exchange 2016.
In this article I have include the steps (not detailed steps as it could be easily found via a simple Google search) which will guide you from Cross Forest Active Directory Migration to Exchange Migration.
NOTE: There was no inter forest mail flow during the migration as we decided to move all the mailboxes over the weekend.
Source Forest:
Windows(2003) , Exchange (2003), Multiple SMTP Domains configured on Exchange 2003
Target Forest:Windows 2012(R2),Exchange(2016), Multiple SMTP Domains configured as the Accepted Domains.
The migration task was broken in to several sequential steps.
1)User Migration (via ADMT)
2)Group Migration(via ADMT)
3)Workstation Migration (via ADMT)
4)Mailbox Migration(via CodeTwo)
Based on the above we started preparing the prerequisites for the steps 1-3(Exchange 2016 was already installed on the Target Domain).
– Raised the Forest Functional level and Domain Functional level to
2003 on the Source Domain Controllers.
– Created conditional forwarding on source and target DNS servers
for both domain names to be resolved vice versa.
– Created two way trust between the source and target forest.
– Created a group called ADMTAdmin(on source) and added the
Domain Admin(Target). Thereafter created a group policy for the
Restricted group and added the ADMT Admin Group(This is to
have local administrator rights on all source forest workstations).
– Created another group policy to disable Windows Firewall.
– Install SQL Express and .NET Framework on the Target DC prior to
installing the ADMT.
– Install Password Export Server on the source Domain Controller
(This is to import the same password).This will require the below
steps.
– Create PAC Key on Target *
(admt key /option:create /sourcedomain:ebyader.com
/keyfile:”c:\PES.pes” /keypassword:*)* (use this extracted key
when installing the PES Application)
– PES service should be run as using target admin account) *
– Finally Add the Administrator use to remote builtin Administrator
group vice versa on each forest..
Once the above are done you can start migrating the users,groups and workstations. The ADMT will prepare the workstations to work on the new domain but accessing the same profile.The Outlook profile still will be pointed to the old exchange server.(In order to avoid the password prompt you could grant Mailbox right for the target AD account to his/her mailbox).
Any issues related to ADMT and the required troubleshooting steps were collected from the website: https://blog.thesysadmins.co.uk/admt-series-1-preparing-active-directory.html
Issues faced at this stage.
Issue 1: Users get blank profile with out any data.
Solution:
Ask the user to log off from the user workstation.
– Run Regedit from your computer. Connect Network Registry to the user workstation.
– Go to HKEY_LOCAL_MACHINE\Software\Microsoft\Windows NT\CurrentVersion\ProfileList
– Go through the Profile list and identify the Source account. Copy the value from the ProfileImagePath key.
– Again go through the Profile list and identify the Target account. Paste the ProfileImagePath key value there.
– Restart the user workstation.
The ProfileImagePath key will be same value for both Source and Target user accounts. This ensures both source and target users will receive the same profile which is stored under C:\Documents and Settings\UserName.
Issue2: Outlook users will not be able to access their email as per attached error.
![]()
Solution: This is because the autodisover on Exchange 2016 will try to reconfigure the outlook. Thus you could set the autodiscover url to null, and remove the autodiscover DNS record created in the local DNS servers(Target).
Issue3: Failed to change domain affiliation, hr=800704f1 .
Solution: Enabled the Group Policy on the Target DC as
Default Domain Controller Policy-Computer Configuration-Policies-Admin Templates-System-Net Logon-Allow cryptography —NT 4.0
At this stage all the users ,groups and workstation were migrated to the new target forest but still accessing the old exchange mail flow.Thus we reached the climax of this project which is the exchange migration. we started preparing the prerequisites for Exchange Migration using CodeTwo
– Installed Windows 2012 R2 and joined to the Source domain.
– Login with the domain administrator account
– Install CodeTwo (please refer the user manual from CodeTwo , but
in my case I skipped all the prerequisites as I was not intended to
maintain any mail flow between two forests.
– Started Exchange Migration in batches and completed successfully.
– Informed the ISP to change the MX toward the new IP pointing to
Exchange 2016 server.
– Did a rescan (CodeTwo command to copy any missed or new
items from the source mailboxes to new mailboxes.
Issue Faced:When migrating with CodeTwo you will receive ErrorMessageSizeExceeded
Solution: EAC -> Mail Flow-> More Option -> OrganizationTransportSettings -> Change it to more than 100.
http://www.codetwo.com/kb/changing-the-message-size-limit/?sts=1646.
Finally we enabled the autodiscover and recreated the autodiscover DNS record. In order to minimize the work involved to recreate the profile in outlook we pushed the below Group Policy entries as it will enable the user to press “new” button on the popup that display when they double click on outlook icon.
————————————————————————————-
For Outlook 2016:
HKEY_CURRENT_USER\Software\Microsoft\Office\16.0\Outlook\AutoDiscover
As a policy:
HKEY_CURRENT_USER\Software\Policies\Microsoft\Office\16.0\Outlook\AutoDiscover
For Outlook 2013:
HKEY_CURRENT_USER\Software\Microsoft\Office\15.0\Outlook\AutoDiscover
As a policy:
HKEY_CURRENT_USER\Software\Policies\Microsoft\Office\15.0\Outlook\AutoDiscover
For Outlook 2010
HKEY_CURRENT_USER\Software\Microsoft\Office\14.0\Outlook\AutoDiscover
As a policy:
HKEY_CURRENT_USER\Software\Policies\Microsoft\Office\14.0\Outlook\AutoDiscover
For Outlook 2007:
HKEY_CURRENT_USER\Software\Microsoft\Office\12.0\Outlook\AutoDiscover
As a policy:
HKEY_CURRENT_USER\Software\Policies\Microsoft\Office\12.0\Outlook\AutoDiscover
2. Once the key is created, right-click in the right pane and click New, click DWORD Value and type in “ZeroConfigExchange” (without the quotes) and then press ENTER.
3. Finally, right-click ZeroConfigExchange, click Modify and then in the Value data box, type 1, and then click OK
————————————————————————————-
In case if the outlook is not prompting create the below entry as well
HKEY_CURRENT_USER\Software\Microsoft\Exchange\Client\Options
String Value: PickLogonProfile
Data: 1
All these above Registry entries can be pushed via GroupPolicy.
Hope I have covered all the required steps in brief and anybody who wants to perform a cross forest migration using Code Two , can refer this article as guideline for their project.The other fact which I decided to write this article is that I did not find any single article/post on the Internet which covering all the cross forestmigration processes staring from Active Directory Objects to Mailboxes.
Cheers !!
Muralee
How to perform a Local Mailbox Move Request on Exchange 2013
Dears
I have prepared the below screen cast to guide you through the steps of moving an Active Mailbox.
1) Create a new Move Request via Exchange Shell (Orange2 Mailbox has been moved to MailDB1 Database)
![]()
2) Initialize or Start the Move Request
![]()
3) Check the Status of the Request.
![]()
How to create Exchange 2013 DAG and Test DAG Failover
Dear Folks
Today I decided to write a post explaining Exchange 2013 DAG Switchover/Switchback and Failover/Failback because I could not find a proper or an consolidated article in the Internet which explains the required steps to install and test the DAG.
This article will be divided in to 3 sections
Step 1 – Installation of Exchange Prerequisites and Exchange Installation
Step 2 – DAG creation
Step 3 – Testing (Switchover/Switchback and Failover/Failback)
Environment
1 DC (Windows 2012 R2 OS, Domain: Test.local)
2 Exchange Servers(Windows 2012 R2 OS, Exchange 2013 CU6)
Step 1 – Installation of Exchange Prerequisites and Exchange Installation
In this series we will walk you through the process of performing a clean installation of Exchange 2013 in single server.(Windows OS installation will not be covered)
> Begin with Installing the AD DS and AD LDS Roles to prepare the AD forest for the Exchange 2013 deployment.

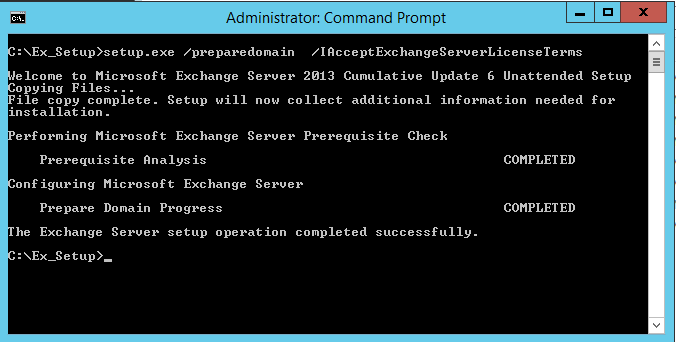
> Thereafter open an elevated command prompt run the prepare schema command
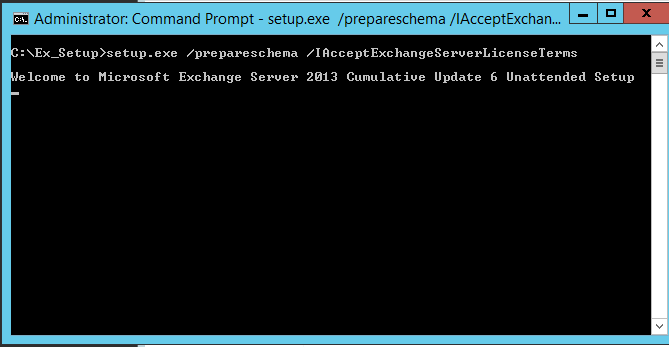
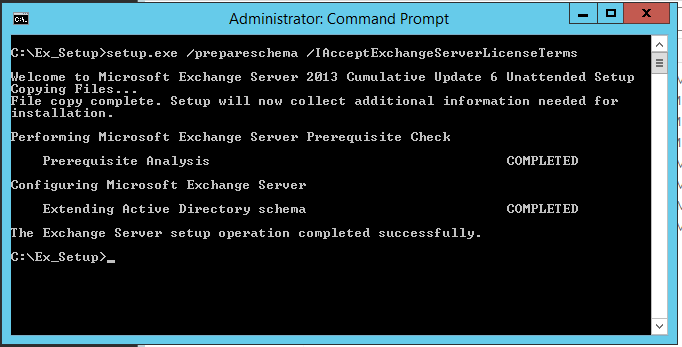
> Then start with the AD Preparation in this you need to mention the Exchange Server Organization Name

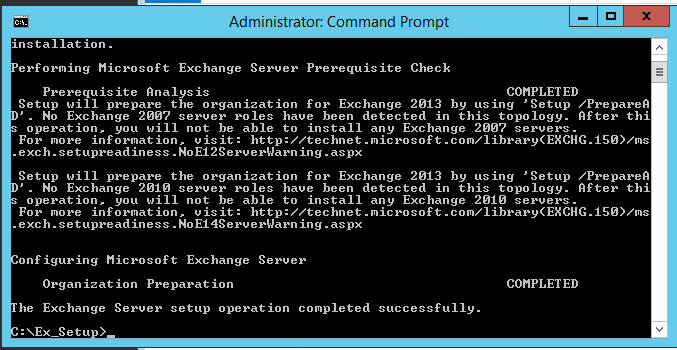
> Now you could prepare the domain.

> We need to install the below prerequisite based on exchange roles that will be installed since my deployment is single server role (cas and mbox together)
Install-WindowsFeature AS-HTTP-Activation, Desktop-Experience, NET-Framework-45-Features, RPC-over-HTTP-proxy, RSAT-Clustering, RSAT-Clustering-CmdInterface, Web-Mgmt-Console, WAS-Process-Model, Web-Asp-Net45, Web-Basic-Auth, Web-Client-Auth, Web-Digest-Auth, Web-Dir-Browsing, Web-Dyn-Compression, Web-Http-Errors, Web-Http-Logging, Web-Http-Redirect, Web-Http-Tracing, Web-ISAPI-Ext, Web-ISAPI-Filter, Web-Lgcy-Mgmt-Console, Web-Metabase, Web-Mgmt-Console, Web-Mgmt-Service, Web-Net-Ext45, Web-Request-Monitor, Web-Server, Web-Stat-Compression, Web-Static-Content, Web-Windows-Auth, Web-WMI, Windows-Identity-Foundation ( For other roles please refer Technet Article http://technet.microsoft.com/en-us/library/bb691354%28v=exchg.150%29.aspx )


> Next we install the below mentioned components in the mentioned order as
1.Net Framework 4.5.2 (Only for CU7 , In case CU6 the required .NET Framework is pre installed)
2.Microsoft Unified Communication Managed API 4.0,Core Runtime 64-bit
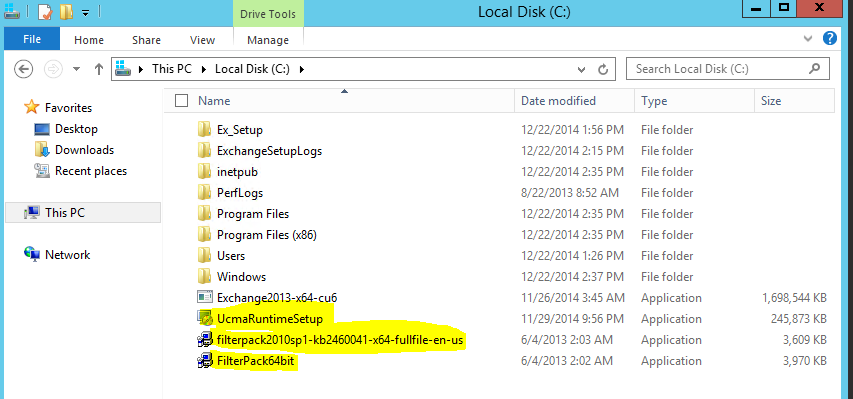
> Finally begin the Exchange Installation by running setup.exe and follow the screen (selected option may vary based on your environment requirements) below are some of the customized options as per my LAB


Step 2 – DAG creation
Now we have installed the Exchange Servers. We will begin with the DAG creation.
> As a prerequisite the Exchange Installation or the Database and Log location should not to be identical in my case it was not
hence I need to move the Database and Log Files.

> Thereafter we need to pre create the CNO (Cluster Name Object) when we deploy DAG on Windows 2012 or Windows 2012 R2
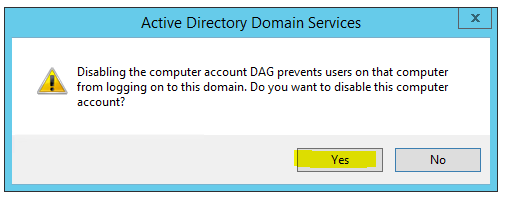
1) Create a new computer object via Active Directory Users and Computer Snap-in

2) Disable the Computer Account created above and Press ” Yes” on the Prompt.

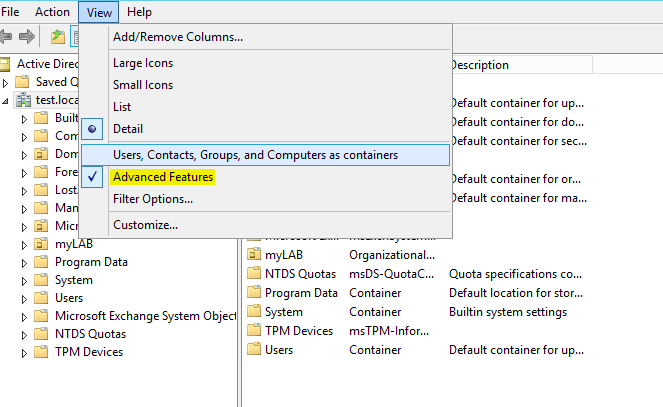
3) Enable “Advanced Features”
4) Right Click the Computer Object Created and add one of the Exchange Mailbox server and grant Full control

5) Add the File Witness Server in my case the Domain Controller in Exchange Trusted Sub System Group

6) Add the Exchange Trust Subsystem group on the Local Administrator Group of the File Witness Server.

Everything is done now we will begin with the DAG creation
7) We will create a DAG with the below parameteres
DAG Name : – DAG
IP Address :- 192.168.252.131
FSW Server : dc.test.local

NOTE:- I forgot the step 6 in my LAB and the FSW was not created , hence I need to re set the FSW property on my DAG after completing the Step6
![]()
![]()
8) Add the Mailbox Servers to the DAG.
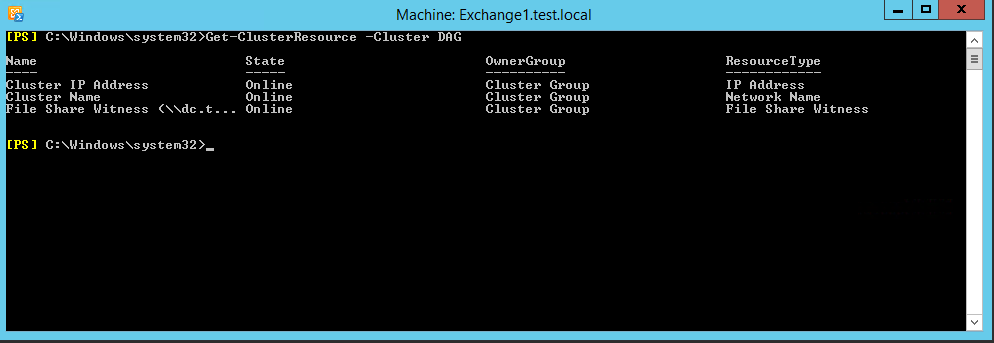
![]()
9) Verify the Cluster Resource to confirm whether the above commands are executed correctly and the required cluster resources has been created.
10) Now we are going to make the Database Copies ,hence check the Database and Log Path on the Exchange Server.
![]()
11) Add the First Copy
![]()
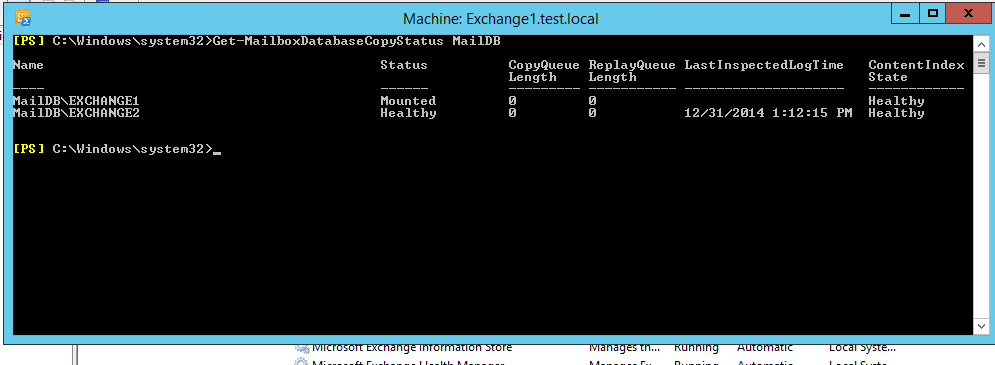
12) Verify the Database Copy Status and repeat the steps for the other databases.
(If you notice any status other the Healthy you could give some time or simply restart the Information Store Service.)
Step 3 – Testing (Switchover/Switchback and Failover/Failback)
1) Now we have successfully created the DAG we will go through the testing .( While testing I prefer if you could open an E-Mail Client to test the email flow between 2 accounts)
We will perform a database switchover which is a planned activity and can be done via ECP , Hence login to ECP –> Servers –> Databases
Select the passive copy of the database on the Exchange2 server and click on activate it.

Test the e-mail flow .
2) Now we will test the automatic service recovery a beautiful feature of DAG.
In the below snapshot we will stop the IISAdmin service and confirm that Exchange will restart the service automatically

3) Now we will perform a Failover which is an unplanned activity,In order to do this we will crash or stop the process Microsoft.Exchange.Store.Worker
on theExchange2 Server
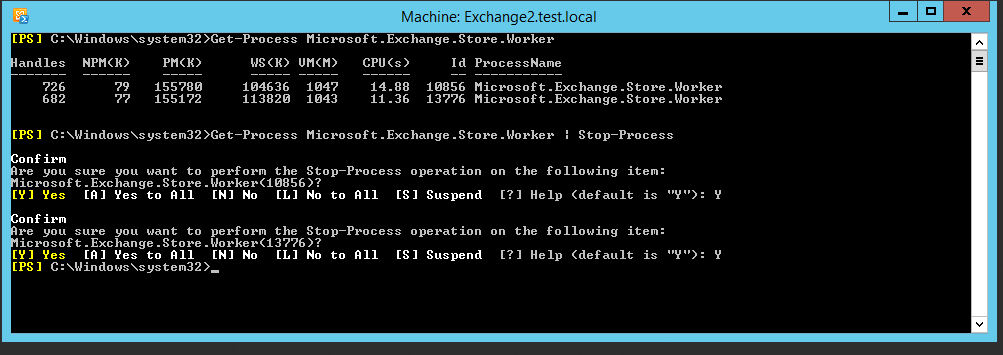
Once it done you will notice on the ECP that the Passive Database is activated automatically on the Exchange1 Server and now you could test the e-mail flow.

Done.
How to move the database and transaction log files on Exchange 2010 DAG servers
Hi Folks
In case if you want move the transaction logs and the exchange database to a new location on the disk , you have to follow certain guidelines to avoid exchange nightmare.
But I would like to recommend you do this before you establish the DAG ,
In-case if you have forgotten to do this before establishing the DAG you should do the below steps on the exchange servers that are part of the DAG in the mentioned order
– Disable the Circular logging ( In-case if it was enabled before)
– Then you need to remove the database copies on each database per each each server
Remove-MailboxDatabaseCopy -Identity DB1\MBX1 -Confirm:$False (This Eg:- will remove the copy of the database DB1 on the MBX1 server)
– Create the necessary folder on the new location
– Move the Mailbox databases as below
* Open Exchange Management Console
* Navigate to Organization Configuration -> Mailbox -> Database Management -> Select the Mailbox Database
* Right click on it select “Move Database Path” and enter the new locations
– On each DAG member server you will find the passive copy of the database for the other member servers,normally stored on the original location where the Active Mailbox is
stored ,You need to move these files to the new location , Keep in mind when you are moving the Passive Copies of the database it should be stored on the same drive letter where
the Active Mailbox database is stored on the active member.
Eg:- Server1 host the mailbox DB1 on C:\DB Folder , hence you need to maintain the same drive letter on the remote server(Server2) where it will host the passive copy for the DB1
Do the same on all the DAG members
– Now add the Mailbox database copies for all the servers.
Add-MailboxDatabaseCopy -Identity DB1 -MailboxServer Server2 -ActivationPreference 2
– On each server where the mailbox was moved run the below commands Net stop msftesql-Exchange Net start MSExchangeSearch
Tip:- I came across an issue where when I changed the drive letter on the server where it holds the mailbox , the database dismounted,therefore if you face the same issue use the
Move-Database command with the -ConfigurationOnly Parameter.
How to identify the Exchange server Service Pack Levels
Hi
Use the below table to identify the Exchange Server versions and their service pack level.
Source :- Technet
| Product name | Build number | Date |
| Microsoft Exchange Server 2003 | 6.5.6944233 | 3 |
| Microsoft Exchange Server 2003 SP1 | 6.5.7226 | 5/25/2004 |
| Microsoft Exchange Server 2003 SP2 | 6.5.7638 | 10/19/2005 |
| Microsoft Exchange Server 2007 | 8.0.685.24 | 12/9/2006 |
| Microsoft Exchange Server 2007 | 8.0.685.25 | 12/9/2006 |
| Microsoft Exchange Server 2007 SP1 | 8.1.240.6 | 11/29/2007 |
| Microsoft Exchange Server 2007 SP2 | 8.2.176.2 | 8/24/2009 |
| Microsoft Exchange Server 2007 SP3 | 8.3.083.6 | 6/20/2010 |
| Microsoft Exchange Server 2010 | 14.0.639.21 | 11/9/2009 |
| Microsoft Exchange Server 2010 SP1 | 14.1.218.15 | 8/24/2010 |
| Microsoft Exchange Server 2010 SP2 | 14.2.247.5 | 12/4/2011 |
| Microsoft Exchange Server 2010 SP3 | 14.3.123.4 | 2/12/2013 |
| Microsoft Exchange Server 2013 | 15.0.516.32 | 10/11/2012 |
Exchange Server 2007 Service Pack1
| Product name | Build number | Date | KB | |
| Microsoft Exchange Server Exchange 2007 SP1 | 8.1.240.6 | 11/29/2007 | ||
| Update Rollup 1 for Exchange Server 2007 Service Pack 1 | 8.1.263.1 | 2/28/2008 |
|
|
| Update Rollup 2 for Exchange Server 2007 Service Pack 1 | 8.1.278.2 | 5/8/2008 |
|
|
| Update Rollup 3 for Exchange Server 2007 Service Pack 1 | 8.1.291.2 | 7/8/2008 |
|
|
| Update Rollup 4 for Exchange Server 2007 Service Pack 1 | 8.1.311.3 | 10/7/2008 |
|
|
| Update Rollup 5 for Exchange Server 2007 Service Pack 1 | 8.1.336.1 | 11/20/2008 | ||
| KB953467 | ||||
| Update Rollup 6 for Exchange Server 2007 Service Pack 1 | 8.1.340.1 | 2/10/2009 |
|
|
| Update Rollup 7 for Exchange Server 2007 Service Pack 1 | 8.1.359.2 | 3/18/2009 |
|
|
| Update Rollup 8 for Exchange Server 2007 Service Pack 1 | 8.1.375.2 | 5/19/2009 |
|
|
| Update Rollup 9 for Exchange Server 2007 Service Pack 1 | 8.1.393.1 | 7/17/2009 |
|
|
| Update Rollup 10 for Exchange Server 2007 Service Pack 1 | 8.1.436.0 | 4/9/2010 |
|
Exchange Server Service Pack 2
| Product name | Build number | Date | KB | |
| Microsoft Exchange Server 2007 SP2 | 8.2.176.2 | 8/24/2009 | ||
| Update Rollup 1 for Exchange Server 2007 Service Pack 2 | 8.2.217.3 | 11/19/2009 |
|
|
| Update Rollup 2 for Exchange Server 2007 Service Pack 2 | 8.2.234.1 | 1/22/2010 |
|
|
| Update Rollup 3 for Exchange Server 2007 Service Pack 2 | 8.2.247.2 | 3/17/2010 |
|
|
| Update Rollup 4 for Exchange Server 2007 Service Pack 2 | 8.2.254.0 | 4/9/2010 |
|
|
| Update Rollup 5 for Exchange Server 2007 Service Pack 2 | 8.2.305.3 | 12/7/2010 |
|
Exchange Server Service Pack 3
| Product name | Build number | Date | KB | |
| Microsoft Exchange Server 2007 SP3 | 8.3.083.6 | 6/20/2010 | ||
| Update Rollup 1 for Exchange Server 2007 Service Pack 3 | 8.3.106.2 | 9/9/2010 |
|
|
| Update Rollup 2 for Exchange Server 2007 Service Pack 3 | 8.3.137.3 | 12/10/2010 |
|
|
| Update Rollup 3 for Exchange Server 2007 Service Pack 3 | 8.3.159.0 | 3/2/2011 |
|
|
| Update Rollup 3-v2 for Exchange Server 2007 Service Pack 3 | 8.3.159.2 | 3/30/2011 |
|
|
| Update Rollup 4 for Exchange Server 2007 Service Pack 3 | 8.3.192.1 | 7/7/2011 |
|
|
| Update Rollup 5 for Exchange Server 2007 Service Pack 3 | 8.3.213.1 | 9/21/2011 |
|
|
| Update Rollup 6 for Exchange Server 2007 Service Pack 3 | 8.3.245.2 | 1/25/2012 |
|
|
| Update Rollup 7 for Exchange Server 2007 Service Pack 3 | 8.3.264.0 | 4/16/2012 |
|
|
| Update Rollup 8 for Exchange Server 2007 Service Pack 3 | 8.3.279.3 | 8/13/2012 |
|
|
| Update Rollup 8-v2 for Exchange Server 2007 Service Pack 3 | 8.3.279.5 | 10/9/2012 |
|
|
| Update Rollup 8-v3 for Exchange Server 2007 Service Pack 3 | 8.3.279.6 | 11/13/2012 |
|
|
| Update Rollup 9 for Exchange Server 2007 Service Pack 3 | 8.3.297.2 | 12/10/2012 |
|
|
| Update Rollup 10 for Exchange Server 2007 Service Pack 3 | 8.3.298.3 | 2/11/2013 |
|
|
| Update Rollup 11 for Exchange Server 2007 Service Pack 3 | 8.3.327.1 | 8/13/2013 |
|
Exchange Server 2010
| Product name | Build number | Date | KB | |
| Microsoft Exchange Server 2010 RTM | 14.0.639.21 | 11/9/2009 | ||
| Update Rollup 1 for Exchange Server 2010 | 14.0.682.1 | 12/9/2009 |
|
|
| Update Rollup 2 for Exchange Server 2010 | 14.0.689.0 | 3/4/2010 |
|
|
| Update Rollup 3 for Exchange Server 2010 | 14.0.694.0 | 4/9/2010 |
|
|
| Update Rollup 4 for Exchange Server 2010 | 14.0.702.1 | 6/17/2010 |
|
|
| Update Rollup 5 for Exchange Server 2010 | 14.0.726.0 | 12/13/2010 |
|
Exchange Server 2010 Service Pack 1
| Product name | Build number | Date | KB | |
| Microsoft Exchange Server 2010 SP1 | 14.1.218.15 | 8/24/2010 | ||
| Update Rollup 1 for Exchange Server 2010 SP1 | 14.1.255.2 | 10/4/2010 |
|
|
| Update Rollup 2 for Exchange Server 2010 SP1 | 14.1.270.1 | 12/9/2010 |
|
|
| 14.1.289.3 | 3/7/2011 |
|
||
| Update Rollup 3 for Exchange Server 2010 SP1 | ||||
| Update Rollup 3-v3 for Exchange Server 2010 SP1 | 14.1.289.7 | 4/1/2011 |
|
|
| Update Rollup 4 for Exchange Server 2010 SP1 | 14.1.323.1 | 6/22/2011 |
|
|
| Update Rollup 4-v2 for Exchange Server 2010 SP1 | 14.1.323.6 | 7/27/2011 |
|
|
| Update Rollup 5 for Exchange Server 2010 SP1 | 14.1.339.1 | 8/23/2011 |
|
|
| Update Rollup 6 for Exchange Server 2010 SP1 | 14.1.355.2 | 10/27/2011 |
|
|
| Update Rollup 7 for Exchange Server 2010 SP1 | 14.1.421.0 | 8/13/2012 |
|
|
| Update Rollup 7-v2 for Exchange Server 2010 SP1 | 14.1.421.2 | 10/9/2012 |
|
|
| Update Rollup 7-v3 for Exchange Server 2010 SP1 | 14.1.421.3 | 11/12/2012 |
|
|
| Update Rollup 8 for Exchange Server 2010 SP1 | 14.1.438.0 | 12/10/2012 |
|
Exchange Server Service Pack 2
| Product name | Build number | Date | KB | |
| Microsoft Exchange Server 2010 SP2 | 14.2.247.5 | 12/4/2011 | ||
| Update Rollup 1 for Exchange Server 2010 SP2 | 14.2.283.3 | 2/13/2012 |
|
|
| Update Rollup 2 for Exchange Server 2010 SP2 | 14.2.298.4 | 4/16/2012 |
|
|
| Update Rollup 3 for Exchange Server 2010 SP2 | 14.2.309.2 | 5/29/2012 |
|
|
| Update Rollup 4 for Exchange Server 2010 SP2 | 14.2.318.2 | 8/13/2012 |
|
|
| Update Rollup 4-v2 for Exchange Server 2010 SP2 | 14.2.318.4 | 10/9/2012 |
|
|
| Update Rollup 5 for Exchange Server 2010 SP2 | 14.2.328.5 | 11/13/2012 | KB2719800 | |
| Update Rollup 5-v2 for Exchange Server 2010 SP2 | 14.2.328.10 | 12/10/2012 |
|
|
| Update Rollup 6 for Exchange Server 2010 SP2 | 14.2.342.3 | 2/11/2013 |
|
|
| Update Rollup 7 for Exchange Server 2010 SP2 | 14.2.375.0 | 8/13/2013 |
|
Exchange Server 2010 Service Pack 3
| Product name | Build number | Date | KB | |
| Microsoft Exchange Server 2010 SP3 | 14.3.123.4 | 2/12/2013 |
|
|
| Update Rollup 1 for Exchange Server 2010 SP3 | 14.3.146.0 | 5/29/2013 |
|
|
| Update Rollup 2 for Exchange Server 2010 SP3 | 14.3.158.1 | 8/13/2013 |
|
Exchange Server 2013
| Product name | Build number | Date | KB | |
| Microsoft Exchange Server 2013 Preview | 15.0.466.13 | 7/16/2012 | ||
| Microsoft Exchange Server 2013 RTM | 15.0.516.32 | 10/11/2012 | ||
| Exchange Server 2013 Cumulative Update 1 (CU1) | 15.0.620.29 | 4/2/2013 |
|
|
| Exchange Server 2013 Cumulative Update 2 (CU2) | 15.0.712.22 | 7/9/2013 | KB2859928 | |
| Exchange Server 2013 Cumulative Update 2 (CU2-v2) | 15.0.712.24 | 7/29/2013 |
|
|
| Exchange Server 2013 Cumulative Update 3 |
How to delete the Exchange Server transaction logs
Dear Folks
When your are performing a backup which is not Exchange Aware or for some reason the job fails , you will fall in to situation where the exchange transaction logs will not be cleared automatically and end up in eating your disk space.
I have listed the steps where you could identify the logs that have been committed already and delete them manually.
– Open Powershell
– Browse it to the exchange installation directory (x:\Program Files\Microsoft\Exchange Server\V14\bin\)
– Then run the command “eseutil /mk “C:\MDBDATA\MDB01\E00.chk”
Output of the above command will be similar to – Checkpoint: (0x4B1D,FFFF,FFFF)
– Remember the value “0x4B1D”
Go to the Exchange Transactions log folder and arrange the files on the “Modified Time”
– Then look in to the folder for the file with the value “0x4B1D” and delete the files above them.
NOTE:- Since the log files are deleted immediately you must take a full backup for the safety of the exchange environment.
Exchange Installation Tips
Hi Folks
This for my own reference
Exchange Installation on Non Domain Controller
Exchange Installation on Non Domain Controller
* setup.com /PrepareAD /OrganizationName:”MyOrg”
* setup.com /PrepareLegacy ExchangePermissions –> When Co-existence with 2003
* setup.com /PrepareSchema
* setup.com /PrepareDomain
/PrepareDomain domainname
/PrepareAllDomains
—————————————————————————–
To Check the Exchange 2010 integration with AD –> Check for the Microsoft Exchange Security Group
———————————————————————————-
Exchange 2010 Prerequisties (Refer http://technet.microsoft.com/en-us/library/bb691354(EXCHG.140).aspx#WS08R2)
* Office Filter PAck – HT . MBOX
* Import-MOdule ServerManager
For CAS, HT , MBOX
——————-
Add-WindowsFeature NET-Framework,RSAT-ADDS,Web-Server,Web-Basic-Auth,Web-Windows-Auth,Web-Metabase,Web-Net-Ext,Web-Lgcy-Mgmt-Console,WAS-Process-Model,RSAT-Web-Server,Web-ISAPI-Ext,Web-Digest-Auth,Web-Dyn-Compression,NET-HTTP-Activation,RPC-Over-HTTP-Proxy -Restart
For CAS,HT,MBOX,UM
——————
Add-WindowsFeature NET-Framework,RSAT-ADDS,Web-Server,Web-Basic-Auth,Web-Windows-Auth,Web-Metabase,Web-Net-Ext,Web-Lgcy-Mgmt-Console,WAS-Process-Model,RSAT-Web-Server,Web-ISAPI-Ext,Web-Digest-Auth,Web-Dyn-Compression,NET-HTTP-Activation,RPC-Over-HTTP-Proxy,Desktop-Experience -Restart
For CAS &HT
————
Add-WindowsFeature NET-Framework,RSAT-ADDS,Web-Server,Web-Basic-Auth,Web-Windows-Auth,Web-Metabase,Web-Net-Ext,Web-Lgcy-Mgmt-Console,WAS-Process-Model,RSAT-Web-Server,Web-ISAPI-Ext,Web-Digest-Auth,Web-Dyn-Compression,NET-HTTP-Activation,RPC-Over-HTTP-Proxy -Restart
For HT & MBOX
————-
Add-WindowsFeature NET-Framework,RSAT-ADDS,Web-Server,Web-Basic-Auth,Web-Windows-Auth,Web-Metabase,Web-Net-Ext,Web-Lgcy-Mgmt-Console,WAS-Process-Model,RSAT-Web-Server -Restart
For CAS & MBOX
—————
Add-WindowsFeature NET-Framework,RSAT-ADDS,Web-Server,Web-Basic-Auth,Web-Windows-Auth,Web-Metabase,Web-Net-Ext,Web-Lgcy-Mgmt-Console,WAS-Process-Model,RSAT-Web-Server,Web-ISAPI-Ext,Web-Digest-Auth,Web-Dyn-Compression,NET-HTTP-Activation,RPC-Over-HTTP-Proxy -Restart
For CAS Only
————–
Add-WindowsFeature NET-Framework,RSAT-ADDS,Web-Server,Web-Basic-Auth,Web-Windows-Auth,Web-Metabase,Web-Net-Ext,Web-Lgcy-Mgmt-Console,WAS-Process-Model,RSAT-Web-Server,Web-ISAPI-Ext,Web-Digest-Auth,Web-Dyn-Compression,NET-HTTP-Activation,RPC-Over-HTTP-Proxy -Restart
For HT OR MBOX
—————–
Add-WindowsFeature NET-Framework,RSAT-ADDS,Web-Server,Web-Basic-Auth,Web-Windows-Auth,Web-Metabase,Web-Net-Ext,Web-Lgcy-Mgmt-Console,WAS-Process-Model,RSAT-Web-Server -Restart
For UM Only
—————-
Add-WindowsFeature NET-Framework,RSAT-ADDS,Web-Server,Web-Basic-Auth,Web-Windows-Auth,Web-Metabase,Web-Net-Ext,Web-Lgcy-Mgmt-Console,WAS-Process-Model,RSAT-Web-Server,Desktop-Experience -Restart
For Edge Only
—————-
Add-WindowsFeature NET-Framework,RSAT-ADDS,ADLDS -Restart
Only for CAS Set-Service NetTcpPortSharing -StartupType Automatic
———————————————————————————-
Removing CAS Roles
————————————————————————————
[PS] C:\>$vd = Get-OwaVirtualDirectory -Server lab-casex27-01
[PS] C:\>foreach ($objitem in $vd){ Remove-OwaVirtualDirectory $objitem}
Confirm
Are you sure you want to perform this action?
The Remove-OwaVirtualDirectory cmdlet is removing Outlook Web Access virtual
directory “LAB-CASEX27-01\owa (Default Web Site)”.
[Y] Yes [A] Yes to All [N] No [L] No to All [S] Suspend [?] Help
(default is “Y”):
setup /mode:uninstall /role:ca
——————————————————————————————-
Getting Information on Existing Setup
——————————————————————————————-
Get-ClientAccessArray
Get-DatabaseAvailabilityGroup
Get-MailboxDatabase -Server “servername” | fl name,rpc ==> To identify that DB’s are assigned with relevant RPC
Get-ExchangeServer
Creating the CAS Array
————————–
New-ClientAccessArray -Name exchange -Site “Default-First-Site-Name” -Fqdn exchange.integratednetworks.net
Adding the CAS Array to the Mailbox
—————————————————————————–
Get-MailboxDatabase | Set-MailboxDatabase -RPCClientAccessServer “Client.msglab.local”
DAG Configuration
———————————————————————————
New-DatabaseAvailabilityGroup -Name DAG -WitnessServer HV01 -WitnessDirectory “c:\witness” -DatabaseAvailabilityGroupIPAddresses 192.168.1.6 –Verbose
Add-DatabaseAvailabilityGroupServer -Identity DAG -MailboxServer MB0X1 -Verbose
Add-DatabaseAvailabilityGroupServer -Identity DAG -MailboxServer MB0X2 -Verbose
—- Add-MailboxDatabaseCopy -Identity MB01 -MailboxServer EX10-MB02
Set-DatabaseAvailabilityGroup -Identity DAG1 -AlternateWitnessDirectory C:\DAGFileShareWitnesses\DAG1.contoso.com -AlternateWitnessServer CAS3
Setting the DAG Network
—————————
Set-DatabaseAvailabilityGroupNetwork -Identity “\MAPI Network” -ReplicationEnabled:$false
Set-DatabaseAvailabilityGroupNetwork -Identity “\Storage Network” -ReplicationEnabled:$false -IgnoreNetwork:$true
Set-databaseavailabilitygroup DAG –witnessserver HV01 -witnessdirectory c:\witness
To Failback
————————–
RedistributeActiveDatabases.ps1 –DagName DAG1 –BalanceDBsByActivationPreference –Confirm:$false
Test-ReplicationHealth
For OWA Blank Page Error
———————————————————–
Open the updatecas.Ps1 with Powershell
For Addressbook,Public Folders Migration from Exchange 2003 to 2010
——————————————————————-
Get-EmailAddressPolicy | where {$_.RecipientFilterType –eq “Legacy”} |
Set-EmailAddressPolicy –IncludedRecipients AllRecipients
Set-AddressList “All Users” –IncludedRecipients MailboxUsers
Set-AddressList “All Groups” –IncludedRecipients Mailgroups
Set-AddressList “All Contacts” –IncludedRecipients MailContacts
Set-AddressList “Public Folders” –RecipientFilter {RecipientType –eq “PublicFolder”}
Set-GlobalAddressList “Default Global Address List” -RecipientFilter {(Alias -ne $null -and (ObjectClass -eq ‘user’ -or ObjectClass -eq ‘contact’
-or ObjectClass -eq ‘msExchSystemMailbox’ -or ObjectClass
-eq ‘msExchDynamicDistributionList’ -or ObjectClass -eq ‘group’
-or ObjectClass -eq ‘publicFolder’))}
To enable Antispam on Exchange 2010
————————————-
-.\install-AntispamAgents.ps1
– Restart-Service MSExchangeTransport
– Set-TransportConfig -InternalSMTPServers x.x.x.x,y.y.y.y ( Enter all the SMTP servers)
——————————————————————————————–
Exchange 2013
** Before Installing Exchange 2013 you must prepare the Active Directory , and the mahine used to preapre
the AD should have
Microsoft .NET Framework 4.5
Windows Management Framework 3.0 (.NET Framework 4.5 and Windows Management Framework 3.0 are included with Windows Server 2012 and don’t need to be installed separately. )
# Install-WindowsFeature RSAT-ADDS
Then prepare the Active Directory ( SUbstitute with /IAcceptExchangeServerLicenseTerms)
# setup /PrepareSchema
# setup /PrepareAD [/OrganizationName:]
# setup /PrepareDomain
Then Mailbox and Client Access Role together
———————————————-
Install-WindowsFeature AS-HTTP-Activation, Desktop-Experience, NET-Framework-45-Features, RPC-over-HTTP-proxy, RSAT-Clustering, RSAT-Clustering-CmdInterface, Web-Mgmt-Console, WAS-Process-Model, Web-Asp-Net45, Web-Basic-Auth, Web-Client-Auth, Web-Digest-Auth, Web-Dir-Browsing, Web-Dyn-Compression, Web-Http-Errors, Web-Http-Logging, Web-Http-Redirect, Web-Http-Tracing, Web-ISAPI-Ext, Web-ISAPI-Filter, Web-Lgcy-Mgmt-Console, Web-Metabase, Web-Mgmt-Console, Web-Mgmt-Service, Web-Net-Ext45, Web-Request-Monitor, Web-Server, Web-Stat-Compression, Web-Static-Content, Web-Windows-Auth, Web-WMI, Windows-Identity-Foundation
Thereafter install the below
1.Microsoft Unified Communications Managed API 4.0, Core Runtime 64-bit
2.Microsoft Office 2010 Filter Pack 64 bit
3.Microsoft Office 2010 Filter Pack SP1 64 bit
Installing only the Client Access role
———————————————-
Install-WindowsFeature AS-HTTP-Activation, Desktop-Experience, NET-Framework-45-Features, RPC-over-HTTP-proxy, RSAT-Clustering, Web-Mgmt-Console, WAS-Process-Model, Web-Asp-Net45, Web-Basic-Auth, Web-Client-Auth, Web-Digest-Auth, Web-Dir-Browsing, Web-Dyn-Compression, Web-Http-Errors, Web-Http-Logging, Web-Http-Redirect, Web-Http-Tracing, Web-ISAPI-Ext, Web-ISAPI-Filter, Web-Lgcy-Mgmt-Console, Web-Metabase, Web-Mgmt-Console, Web-Mgmt-Service, Web-Net-Ext45, Web-Request-Monitor, Web-Server, Web-Stat-Compression, Web-Static-Content, Web-Windows-Auth, Web-WMI, Windows-Identity-Foundation
Thereafter install the below
—————————–
•Microsoft Unified Communications Managed API 4.0, Core Runtime 64-bit
How to access the Management Console
————————————–
High Availability
http://technet.microsoft.com/library/dd638129%28EXCHG.150%29
Chaning the Exhange Database Names and Paths
———————————————-
Move-Databasepath “DatabaseName” –EdbFilepath “C:\Newlocation\DBname.edb” –LogFolderpath “C:\Newlocation”
Only moving the logpath
————————-
Move-Databasepath -identity “DatabaseName” –LogFolderpath “C:\Newlocation”
Move-Databasepath “DatabaseName” –EdbFilepath “C:\Newlocation\DBname.edb” –LogFolderpath “C:\Newlocation”
Creating Client Acces Array
——————————–
http://exchangeserverpro.com/exchange-2013-client-access-server-high-availability/
