How to check the Physical Status of Network Card in Linux
On Linux servers the status of NIC cards cannot be determined via the ipconfig command alone , in that case you could use one of the below commands to get the required infromation
# mii-tool eth0
# cat /sys/class/net/eth0/operatestate
# ethtool eth0
# ip link ls dev eth0
Good Luck .
Virtualized Domain Controller Nightmare on Nutanix Hyper-V Cluster
Hi Guys
We recently deployed a Hyper-V Nutanix Cluster , and everything looked fine until we hit the wall. For some reasons if the VM(Domain Controllers) go down you will not be able to power it on . The reason behind this that the Hyper-V Cluster on Nutanix uses SMB3 based share as the shared storage . Unless the Hypervisor is able to authenticate the access to the SMB3 share is blocked. In our case it was not possible because the 2 DC VM’s were powered off and unable to power it on.(Chicken and Egg situation)
Error Message I received:


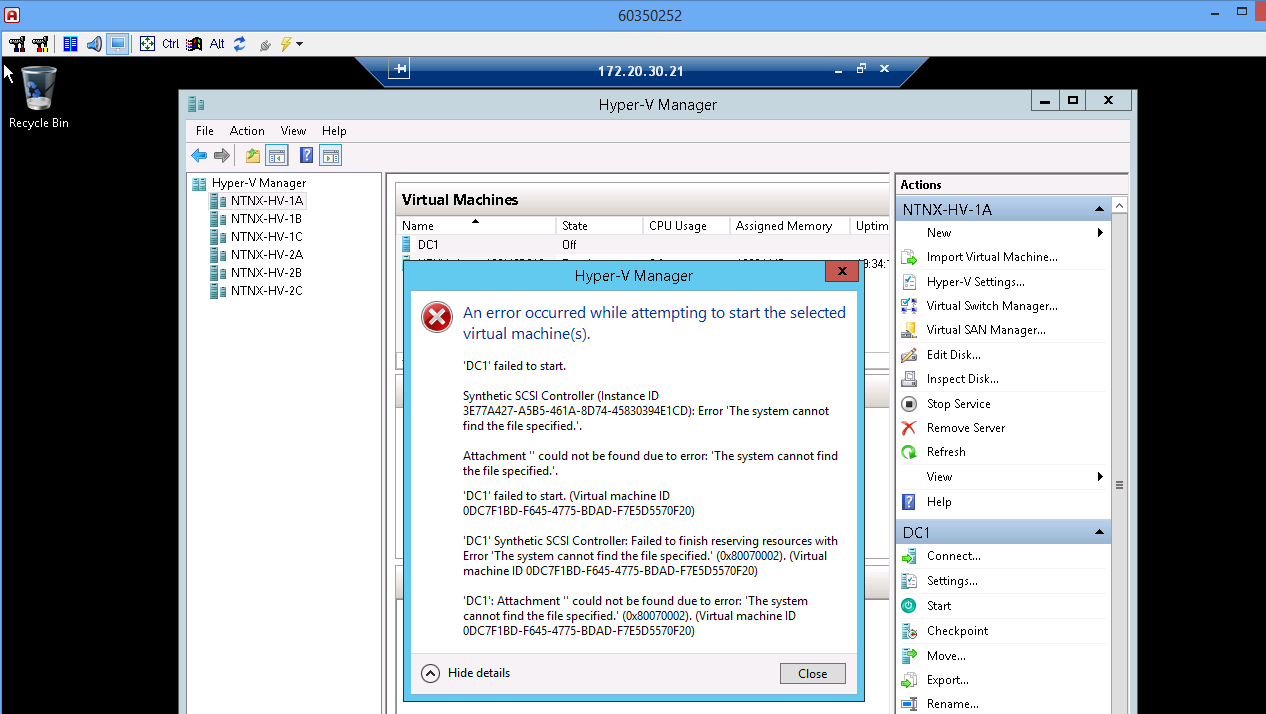
The below Nutanix article explains the below:
Source:https://portal.nutanix.com/#/page/kbs/details?targetId=kA032000000TTGWCA4

So the conclusion is that you must need either a physical domain controller or a DC VM that does not sit on the SMB3 share. Hopefully the Windows 2016 may come up with a solution for this scenario.
Update1: As a last resort , I changed the Virtual disk path from on the DC VM from the FQDN of the cluster name to the IP address of the cluster , voila I was able power it on the 2 VM’s(but I do not have any clue how this has worked)
How to Allow Mail Relay on Exchange 2016
Hi All
Being an Exchange Administrator you would often come across requirements to allow mail relay from Internal Application or Some Appliances in order to send emails alerts through your Exchange Server. In this case you need to do the below;
- Create a New Receive Connector with any name E.g: Anonymous Relay
- Select the Role as FrontEnd Transport
- Select the Usage Type as Custom
- Leave the bindings as default.
- In the Remote IP addresses that are allowed to use this connector enter the IP addresses of your appliance of application server which wants to use the Exchange for Mail Relay
Once the above steps are done , you need to run the below PS Commands:
-
Set-ReceiveConnector "Anonymous Relay" -PermissionGroups AnonymousUsers
-
Get-ReceiveConnector "Anonymous Relay" | Add-ADPermission -User "NT AUTHORITY\ANONYMOUS LOGON" -ExtendedRights "Ms-Exch-SMTP-Accept-Any-Recipient"
Source1 :https://technet.microsoft.com/en-us/library/mt668454(v=exchg.160).aspx
Source2:http://exchangeserverpro.com/exchange-2016-smtp-relay-connector/#comment-409194
UPDATE:1 With Exchange 2016 CU3 you will not be able to create this connector through the ECP , thus you need to use the below PS commands:
New-Receiveconnector -Name “Mail Relay” -RemoteIPRange (“Remote IP “) -TransportRole “FrontendTransport” -Bindings (“0.0.0.0:25”) -usage “Custom” -Server “Exchange Server Name”
How to import Users to Windows 2012 Active Directory using PowerShell
Hi Guys
In many AD installations I do come across requirements to create multiple users in Active Directory(More than 200 in many cases) .In these cases we could use the below mentioned CSV template and use the PS command to directly import the users in to Active Directory.
![]()
Here the Path value is pointing to the OU that you want to place the users in the Active Directory , which could be find using the Attribute Editor of the OU(We need to enable the Advance Feature in the ADUC Management Console)
PS Command Syntax
Import-CSV C:\anyname.csv | New-ADUser –AccountPassword (ConvertTo-SecureString –AsPlaintext “any complex password” –Force) –PassThru | Enable-ADAccount.
Example:
Import-CSV C:\Users_1.csv | New-ADUser –AccountPassword (ConvertTo-SecureString –AsPlaintext “P@ssw0rd” –Force) –PassThru | Enable-ADAccount
Update2:
I am including here another method to achieve the same.
# Prepare the CSV file as per below(You could any details as much as you want, by adding the correct attribute.)
firstname,lastname,username,email,department,password,jobtitle,company,ou,Mobile
# Then run the below powershell.
+ You must change the active directory domain name.
+ You must change the csv file name.
+ Ensure that , you have given the proper DN namespace for the OU Value. Otherwise , the script will fail with the below error messages:
“No superior reference has been configured for the directory”
“New-ADUser : The object name has bad syntax”
===================================================================================
# Import active directory module for running AD cmdlets
Import-Module activedirectory
#Store the data from ADUsers.csv in the $ADUsers variable
$ADUsers = Import-csv C:\test.csv
#Loop through each row containing user details in the CSV file
foreach ($User in $ADUsers)
{
#Read user data from each field in each row and assign the data to a variable as below
$Username = $User.username
$Password = $User.password
$Firstname = $User.firstname
$Lastname = $User.lastname
$OU = $User.ou #This field refers to the OU the user account is to be created in
$email = $User.email
$telephone = $User.Mobile
$jobtitle = $User.jobtitle
$company = $User.company
$department = $User.department
$Password = $User.Password
#Check to see if the user already exists in AD
if (Get-ADUser -F {SamAccountName -eq $Username})
{
#If user does exist, give a warning
Write-Warning “A user account with username $Username already exist in Active Directory.”
}
else
{
#User does not exist then proceed to create the new user account
#Account will be created in the OU provided by the $OU variable read from the CSV file
New-ADUser `
-SamAccountName $Username `
-UserPrincipalName “$Username@vands.pro” `
-GivenName $Firstname `
-Surname $Lastname `
-Name “$Firstname $Lastname” `
-DisplayName “$Lastname, $Firstname” `
-Enabled $True `
-Path $OU `
-Company $company `
-EmailAddress $email `
-Mobile $telephone `
-Title $jobtitle `
-Description $jobtitle `
-Department $department `
-AccountPassword (convertto-securestring $Password -AsPlainText -Force) -ChangePasswordAtLogon $True
}
}
===============================================================================
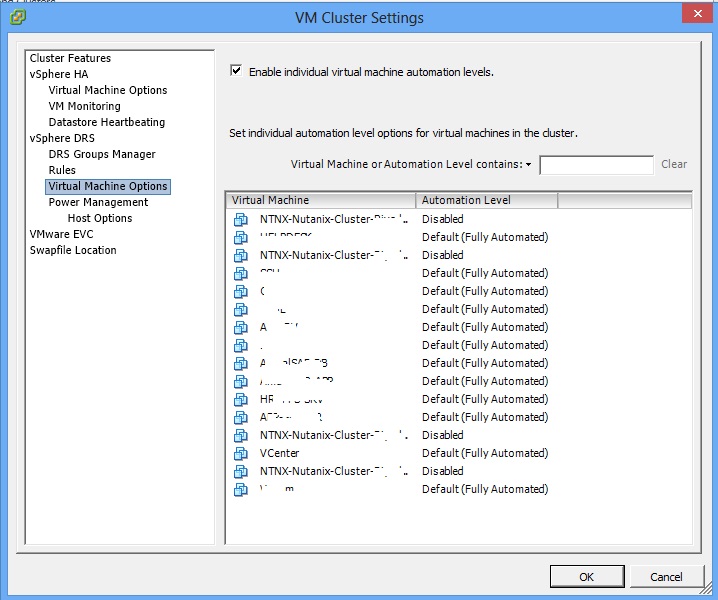
Nutanix Best Practices for VMware
Hi Folks
Recently we got an opportunity to work with Nutanix Converged Solution . When we deployed there was some customization that we need to make on HA / DRS Cluster settings to realign the configuration according to Nutanix – VMware Best Practices
(These information were provided by the support team)
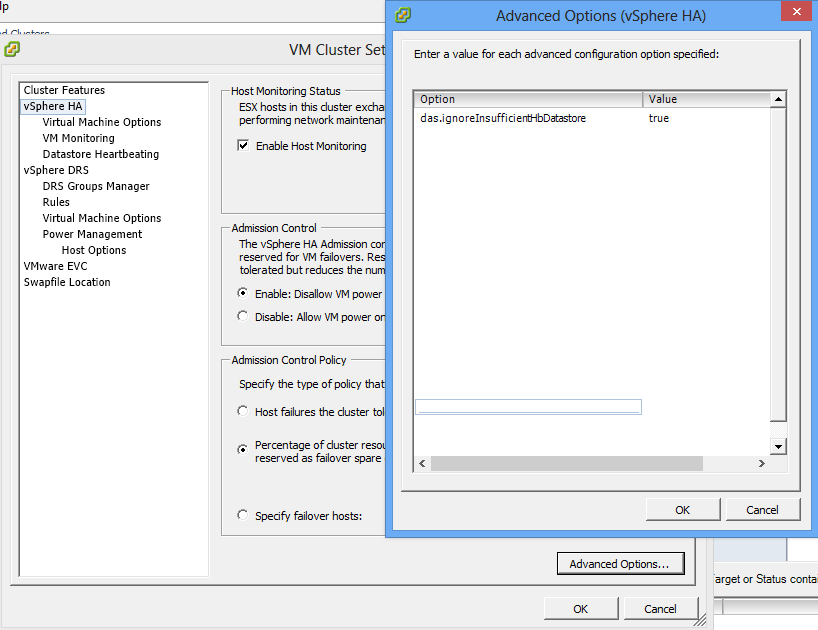
Note1: In Nutanix Cluster is created with single Datastore the Vsphere HA will popup error related to HA Heartbeat stating insufficient datastore for heartbeat , that could be suppress as below
Note2: In HA Cluster the VM restart priority and Host Isolation Response need to be changed for CVM’s as below:

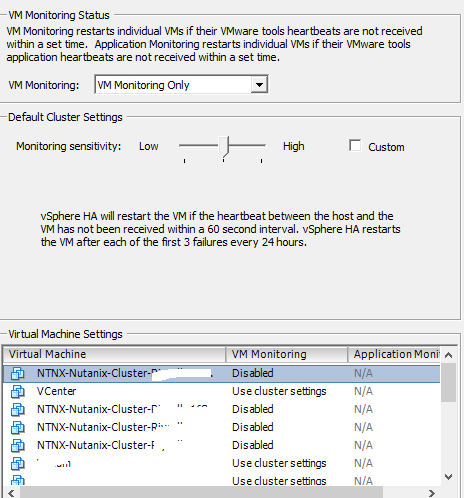
Note3: The VM Monitoring for CVM’s need to be disabled
Note4: In DRS Cluster the Automation level for CVM’s need to be disabled as well
Exchange 2010 Transport Service starts and stops automatically
Dears
Recently I had a problem in one of my customer sites where they have Exchange 2010 servers running on Windows 2008. The initial call I received is that the Inbound email has stopped. When I checked on the server the C:\ free space was less than 4 GB . After some googling I found out that it could be due to Exchange 2010 Back pressure and disabled the Resource Monitoring as below;
- Stopped Exchange Transport Services.
- Open the EdgeTransport.exe.config in the bin folder in Exchange Installation directory
- Edited the parameter <add key=”EnableResourceMonitoring” value=”true” /> to be as false
- Restarted the Transport services
The Mail flow started again , but unfortunately I received the call again saying that the Transport service has stopped , when I tried to start it manually it stops again. After few hours of troubleshooting we decided to contact MS Professional support as we want to bring up the environment as soon as possible. The MS Team went through several process and finally decided to patch the server with the latest Exchange 2010 Rollup 15 , Voila the services was restored.
I shared this , because there are few good articles with regard to MS Exchange Back pressure and MTA service but none of them was related to my experience so it will help somebody who have the same issue.
GoodLuck
Cross Forest Migration from Exchange 2003 to Exchange 2016 using CodeTwo
Hi All
After a long pause I thought add a new post about a recent project that I worked with .The project was to perform a cross forest migration from Exchange 2003 to Exchange 2016 .We had to bypass the double hop migration ,thus we chose CodeTwo exchange migration to move directly from Exchange 2003 to Exchange 2016.
In this article I have include the steps (not detailed steps as it could be easily found via a simple Google search) which will guide you from Cross Forest Active Directory Migration to Exchange Migration.
NOTE: There was no inter forest mail flow during the migration as we decided to move all the mailboxes over the weekend.
Source Forest:
Windows(2003) , Exchange (2003), Multiple SMTP Domains configured on Exchange 2003
Target Forest:Windows 2012(R2),Exchange(2016), Multiple SMTP Domains configured as the Accepted Domains.
The migration task was broken in to several sequential steps.
1)User Migration (via ADMT)
2)Group Migration(via ADMT)
3)Workstation Migration (via ADMT)
4)Mailbox Migration(via CodeTwo)
Based on the above we started preparing the prerequisites for the steps 1-3(Exchange 2016 was already installed on the Target Domain).
– Raised the Forest Functional level and Domain Functional level to
2003 on the Source Domain Controllers.
– Created conditional forwarding on source and target DNS servers
for both domain names to be resolved vice versa.
– Created two way trust between the source and target forest.
– Created a group called ADMTAdmin(on source) and added the
Domain Admin(Target). Thereafter created a group policy for the
Restricted group and added the ADMT Admin Group(This is to
have local administrator rights on all source forest workstations).
– Created another group policy to disable Windows Firewall.
– Install SQL Express and .NET Framework on the Target DC prior to
installing the ADMT.
– Install Password Export Server on the source Domain Controller
(This is to import the same password).This will require the below
steps.
– Create PAC Key on Target *
(admt key /option:create /sourcedomain:ebyader.com
/keyfile:”c:\PES.pes” /keypassword:*)* (use this extracted key
when installing the PES Application)
– PES service should be run as using target admin account) *
– Finally Add the Administrator use to remote builtin Administrator
group vice versa on each forest..
Once the above are done you can start migrating the users,groups and workstations. The ADMT will prepare the workstations to work on the new domain but accessing the same profile.The Outlook profile still will be pointed to the old exchange server.(In order to avoid the password prompt you could grant Mailbox right for the target AD account to his/her mailbox).
Any issues related to ADMT and the required troubleshooting steps were collected from the website: https://blog.thesysadmins.co.uk/admt-series-1-preparing-active-directory.html
Issues faced at this stage.
Issue 1: Users get blank profile with out any data.
Solution:
Ask the user to log off from the user workstation.
– Run Regedit from your computer. Connect Network Registry to the user workstation.
– Go to HKEY_LOCAL_MACHINE\Software\Microsoft\Windows NT\CurrentVersion\ProfileList
– Go through the Profile list and identify the Source account. Copy the value from the ProfileImagePath key.
– Again go through the Profile list and identify the Target account. Paste the ProfileImagePath key value there.
– Restart the user workstation.
The ProfileImagePath key will be same value for both Source and Target user accounts. This ensures both source and target users will receive the same profile which is stored under C:\Documents and Settings\UserName.
Issue2: Outlook users will not be able to access their email as per attached error.
![]()
Solution: This is because the autodisover on Exchange 2016 will try to reconfigure the outlook. Thus you could set the autodiscover url to null, and remove the autodiscover DNS record created in the local DNS servers(Target).
Issue3: Failed to change domain affiliation, hr=800704f1 .
Solution: Enabled the Group Policy on the Target DC as
Default Domain Controller Policy-Computer Configuration-Policies-Admin Templates-System-Net Logon-Allow cryptography —NT 4.0
At this stage all the users ,groups and workstation were migrated to the new target forest but still accessing the old exchange mail flow.Thus we reached the climax of this project which is the exchange migration. we started preparing the prerequisites for Exchange Migration using CodeTwo
– Installed Windows 2012 R2 and joined to the Source domain.
– Login with the domain administrator account
– Install CodeTwo (please refer the user manual from CodeTwo , but
in my case I skipped all the prerequisites as I was not intended to
maintain any mail flow between two forests.
– Started Exchange Migration in batches and completed successfully.
– Informed the ISP to change the MX toward the new IP pointing to
Exchange 2016 server.
– Did a rescan (CodeTwo command to copy any missed or new
items from the source mailboxes to new mailboxes.
Issue Faced:When migrating with CodeTwo you will receive ErrorMessageSizeExceeded
Solution: EAC -> Mail Flow-> More Option -> OrganizationTransportSettings -> Change it to more than 100.
http://www.codetwo.com/kb/changing-the-message-size-limit/?sts=1646.
Finally we enabled the autodiscover and recreated the autodiscover DNS record. In order to minimize the work involved to recreate the profile in outlook we pushed the below Group Policy entries as it will enable the user to press “new” button on the popup that display when they double click on outlook icon.
————————————————————————————-
For Outlook 2016:
HKEY_CURRENT_USER\Software\Microsoft\Office\16.0\Outlook\AutoDiscover
As a policy:
HKEY_CURRENT_USER\Software\Policies\Microsoft\Office\16.0\Outlook\AutoDiscover
For Outlook 2013:
HKEY_CURRENT_USER\Software\Microsoft\Office\15.0\Outlook\AutoDiscover
As a policy:
HKEY_CURRENT_USER\Software\Policies\Microsoft\Office\15.0\Outlook\AutoDiscover
For Outlook 2010
HKEY_CURRENT_USER\Software\Microsoft\Office\14.0\Outlook\AutoDiscover
As a policy:
HKEY_CURRENT_USER\Software\Policies\Microsoft\Office\14.0\Outlook\AutoDiscover
For Outlook 2007:
HKEY_CURRENT_USER\Software\Microsoft\Office\12.0\Outlook\AutoDiscover
As a policy:
HKEY_CURRENT_USER\Software\Policies\Microsoft\Office\12.0\Outlook\AutoDiscover
2. Once the key is created, right-click in the right pane and click New, click DWORD Value and type in “ZeroConfigExchange” (without the quotes) and then press ENTER.
3. Finally, right-click ZeroConfigExchange, click Modify and then in the Value data box, type 1, and then click OK
————————————————————————————-
In case if the outlook is not prompting create the below entry as well
HKEY_CURRENT_USER\Software\Microsoft\Exchange\Client\Options
String Value: PickLogonProfile
Data: 1
All these above Registry entries can be pushed via GroupPolicy.
Hope I have covered all the required steps in brief and anybody who wants to perform a cross forest migration using Code Two , can refer this article as guideline for their project.The other fact which I decided to write this article is that I did not find any single article/post on the Internet which covering all the cross forestmigration processes staring from Active Directory Objects to Mailboxes.
Cheers !!
Muralee
There is no certificates installed on this remote desktop server
On the RD Session Host Configuration when you tried to assign the SSL certificate which you obtained from any vendor you will receive the message in the title.
This is because the SSL certificate need to be imported on .PFX format , In my case the cert i downloaded from GoDaddy was having a .crt extension. Therefore I opened the Certificate-Snapin(Local Computer) and selected the already imported certificate in the Personal container,then I tried to export the certificate as Personal Information Exchange(.pfx)so I could re-import it correctly But I was not able to do so as it was showing the below screen,
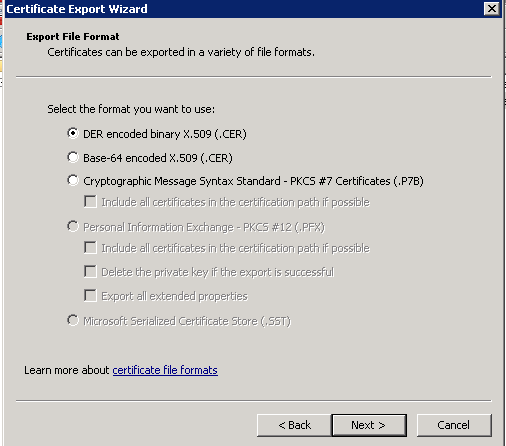
As you see the Personal Information Exchange option is disabled as this is because the SSL certificate does not have the private key.
In order to overcome this get the serial number of the certificate(Open the ssl certificate by double clicking on it and open the details TAB) then on a command prompt entere the below command;
certutil -repairstore my “SerialNumber”
That’s it now you could the export the cert as .pfx and re-import it on Personal and Remote Desktop containers in Certificate Snap-in.
Finally you could select the SSL on RD Session Host configuration.
Source:
http://scexblog.blogspot.com/2010/09/export-personal-information-exchange.html
Update1:
In 2012 and above MS have removed the RDP Snap-in to change the SSL Certificate thus you need to follow the steps mentioned in MS KB Article:https://support.microsoft.com/en-us/help/3042780/remote-desktop-listener-certificate-configurations-in-windows-server-2
Trust relationship cannot be created because the following error occurred
Hi
I was trying to build a Forest wide Trust between 2003 R2 and 2008 R2 environment and I covered the required prerequisites as below;
* The forest functional level should be set to minimum Windows 2003 Server(On the Windows 2003 Domain Controller)
* The conditional forwarding was set up on 2003 and 2008 to resolve target domain names
But still I was getting the error on the title along with the below error ;
“The operation failed: The error is: This operation cannot be performed on the current domain.”
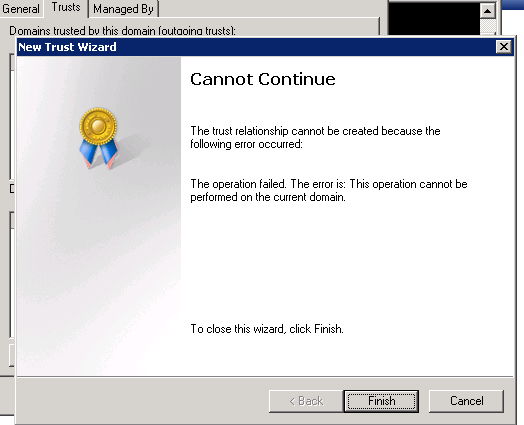
In order to solve this please make sure below identifiers are not same in your both target and source domains
– SID
– NetBIOS name
– DNS name
In my case it was the NetBIOS name and I had to rename the domain name.
Reference
Known Issues for Creating Domain and Forest Trusts
Available From:https://technet.microsoft.com/en-us/library/cc794894%28v=ws.10%29.aspx Accessed (12th May 2015)
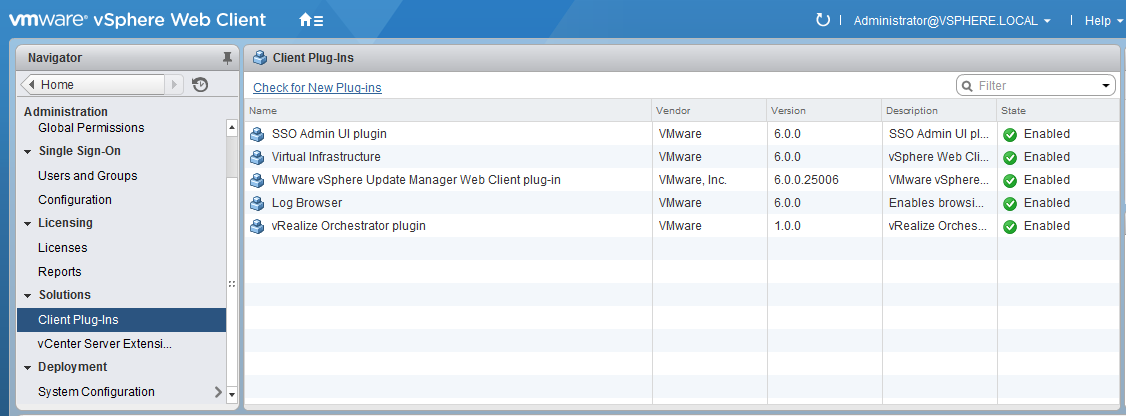
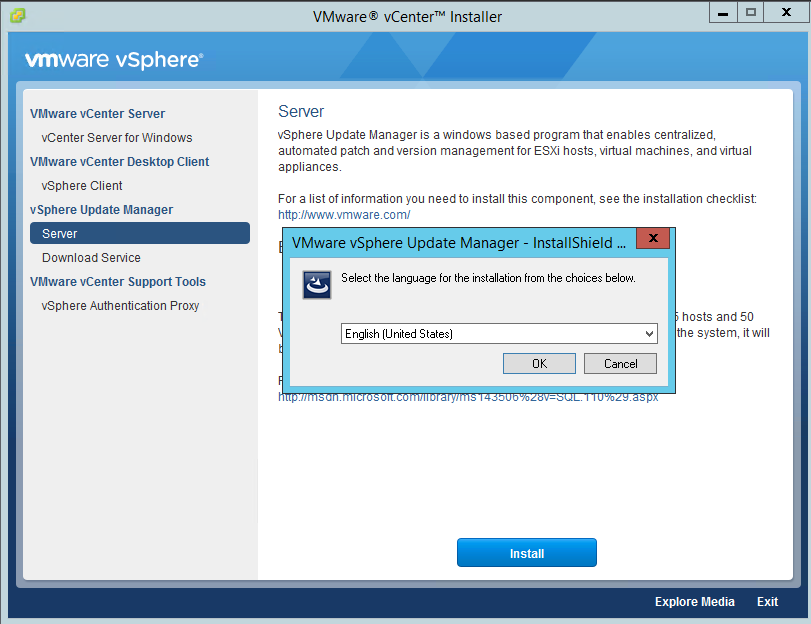
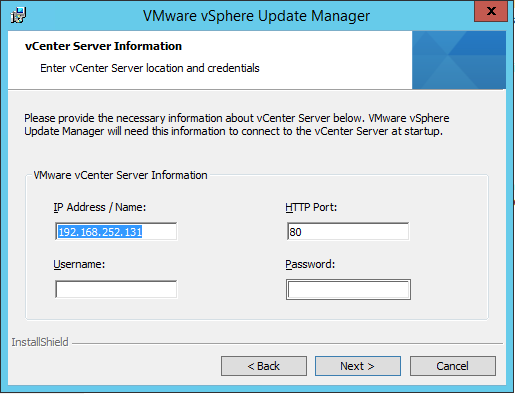
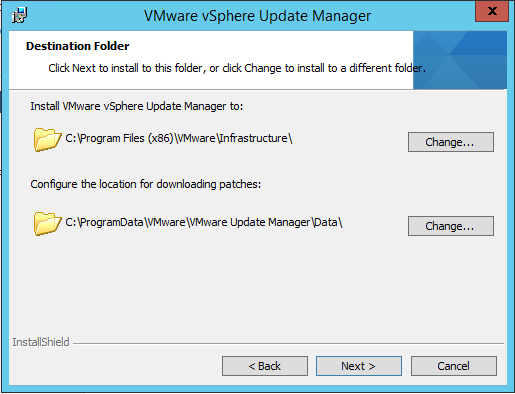
How to Configure VSphere Update Manager 6.0
This article provide a detailed screencast for installing the latest Vsphere Update Manager on ESXi6 , the new version comes with it’s own embedded Microsoft SQL 2012 Express.(As the VCenter uses the built-in Postgres Database)
For those who deploy the Vsphere Update Manager in a controlled environment with no internet access can make use of Update Manger Download Service(UMDS) component which can be installed on the internet facing machine and the Update Manager Server can collect the update from UMDS
You could download the latest package via your VMware account and mount it on a Windows Operating System(Please avoid installing on a Domain Controller)
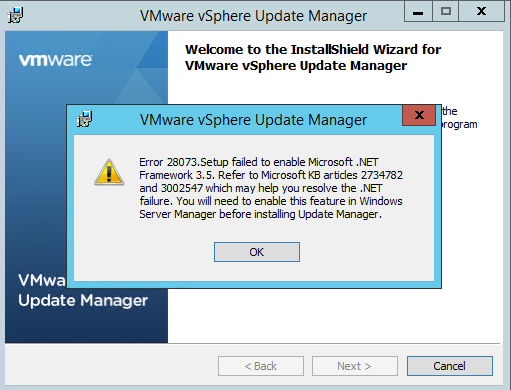
NOTE: You must install the prerequisite of .Net 3.5 Framework SP1 prior installing the package.


Finally once installed log in to Vsphere Web Client and enable the Vsphere Update Manager Web Client-Plugin via Administration –> Solutions–>Client-Plugiuns(incase the Web Client Plugin is not visible click on “Check for New Plug-ins)